 Daylilies do, however, benefit from being dug up and divided every few years, a process their natural toughness allows them to endure with aplomb.
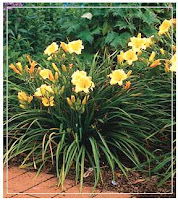
A clump of daylilies is formed of one or more fans—small plants made up of fibrous roots, a growing point (crown), and foliage. Each fan can reproduce itself each year, and before long a clump can increase into a sizable mass of plants. After five or six years, this mass becomes overgrown, producing fewer flowers each season. Dividing the clump and replanting newly separated fans rejuvenates the plants and rewards your efforts with a renewed flush of flowers the following summer.
Of course, you can divide your daylilies before they become overcrowded. You may want to do so to increase your supply of plants, for example, or to slow down those clumps that are
Daylilies do, however, benefit from being dug up and divided every few years, a process their natural toughness allows them to endure with aplomb.
A clump of daylilies is formed of one or more fans—small plants made up of fibrous roots, a growing point (crown), and foliage. Each fan can reproduce itself each year, and before long a clump can increase into a sizable mass of plants. After five or six years, this mass becomes overgrown, producing fewer flowers each season. Dividing the clump and replanting newly separated fans rejuvenates the plants and rewards your efforts with a renewed flush of flowers the following summer.
Of course, you can divide your daylilies before they become overcrowded. You may want to do so to increase your supply of plants, for example, or to slow down those clumps that are  threatening to overpower less robust neighbors in the garden. A large clump of daylilies will yield enough new plants to repopulate the original site, start a new bed, and provide extras to give away to friends.
The best time to divide and replant daylilies is after they have finished blooming, in late summer or early fall. This way the transplants will have time to become established before the first hard frost. In areas with short growing seasons, it is safer to wait until spring to divide daylilies; gardeners in mild climates can divide through the winter.
threatening to overpower less robust neighbors in the garden. A large clump of daylilies will yield enough new plants to repopulate the original site, start a new bed, and provide extras to give away to friends.
The best time to divide and replant daylilies is after they have finished blooming, in late summer or early fall. This way the transplants will have time to become established before the first hard frost. In areas with short growing seasons, it is safer to wait until spring to divide daylilies; gardeners in mild climates can divide through the winter.
-
PREPARE A NEW DAYLILY BED Preparing the soil for a new daylily bed before digging the old clump allows you to get the divisions into the ground without delay, before their roots become dried and damaged from exposure to the open air. Remove any weeds from the chosen spot and work the soil to a depth of a foot or so, incorporating several inches of compost, well-rotted manure, or damp peat moss to make the soil more friable and moisture-retentive. Daylily divisions planted in well-prepared soil will begin to grow quickly and become established before the onset of winter.
- DIG THE CLUMP Cut back the clump's long outer leaves to about six inches to make it easier to handle. Try not to damage the new inner leaves growing in the center of each fan. With a spading fork, loosen the soil all around the clump. Work around the perimeter several times to free as many of the roots from the soil as possible. Because daylilies develop extensive root systems, it may be necessary to dig down 10 to 12 inches. Don't worry if you accidentally break a few of the longer roses—new ones will grow when the divisions are replanted.
Next, use the fork to pry the entire clump out of the ground. Shake or wash excess soil off the roots so you can see the individual fans.


No comments:
Post a Comment