Showing posts with label Christmas and Holiday. Show all posts

Friday, October 26, 2007

How to Select an Artificial Christmas Tree

Decision Time -Its an investment. Yardiac recognizes that buying a tree is not a typical purchase. It is something that will become part of your holiday traditions for many years to come. This is why we believe that we have found the perfect tree for you and your family; So much so we have put a 10 year warranty on the all of the Pre-Lit Trees we sell. This tree will represent Christmas for at least 15 years in your home, and maintain it's beauty for just as long.. We dare you to find a better tree. We can say in complete confidence that we sell the best artificial tree and, at the same time, you will not break the bank. The Christmas Tree Guide for Artificial Christmas Trees will help you understand the differences in Christmas trees. When purchasing Artificial Christmas Trees, keep in mind that most Christmas Trees will last around 15 years so choose wisely. Things you should know before you buy! Molds and Needles Our trees are molded from actual live trees. Yardiac makes shopping easier because we have an easy 'Shop by Style' (Pine, Spruce, and Frazier Fir). These trees were hand-picked by our lead designer who has been working with artificial trees for over 10 years. The material of our needles is Poly Ethylene which is used in an injected molding system to form a group of tree- like branches and needles. These branch molds use real tree branches as forms thus the needles are molded into the correct shape. A wonderful time saving advantage is that they requires little or no shaping. There are countless colors and textures available to choose from with Poly Ethylene (PE). Our tree Expert has studied every tree on the market. This research has provided valuable information resulting in the highest quality synthetic trees sold any where. We dare to compare our quality, as you will find we sell the best artificial trees. All Yardiac trees are a mixture of PE & PVC. Studies show that this preserves the realism of the trees. Fully PE, or molded, trees tend to shine, when lit. It gives a very plastic look. For the discriminating tree seeker, PE/PVC mix is the best choice. Construction Generally there are two major ways manufacturers attach the branches of artificial Christmas trees. They will either be attached to the pole or the trunk. Pole mounted trees are very hard to set up, year after year, and will never have lights.The second method is trunk mounted which is the way all of our trees are constructed. The hinged branch process on artificial Christmas trees is the quickest and easiest to assemble. All the branches are permanently attached and pre-lit. Simply fold down in correct position. Is the Stand Important? In a word, YES!! Make sure that you know what the artificial Christmas trees stand is made of. Common materials are plastic, metal, or wood. Our pre-lit trees include a metal stand. If there will be children or pets around the tree you need to do a tip-over test to see if the tree stand will hold a fully lit and decorated tree upright in case of an accident. Remember that a fully lit and decorated tree will be about twice as heavy. Plastic tree stands are cheaper and have a tendency to bend or break, under stress. Metal tree stands are stronger and, by far, the best. What is the Right Size Tree? A common mistake is to go out with the intention of buying the tallest, widest artificial Christmas tree you can find, only to get home and find that it doesn't fit through the door. The most important thing to consider is where are you going to display your tree. Most home ceilings are 8 feet tall. A 7.5 foot Artificial Christmas Tree will allow you to use a tree topper. If you have vaulted or custom ceilings, you may want to consider a taller tree. Our taller trees can be as tall as 12 feet which can really fill a vaulted room spectacularly. You also need to consider the amount of floor space available in the spot where you want the tree to sit. Measure between the pieces of furniture and from the wall out into the room to determine how wide a tree you can purchase. Each tree will show a diameter chart. Use it to help you determine which tree will best fit in the room of your choice. Yardiac Christmas trees come in regular or slim widths. Full diameter (Regular) are more traditional, but if you are working with a confined area, slim trees are perfect. A tip to save money: You can use a strong wooden box under your artificial Christmas tree and it will increase the height of your tree. You will be able to disguise the booster, once you drape your tree skirt, and place your gifts. This is also helpful, because there is more room for gift boxes, and decorations, under the tree. Once you have picked out your tree, don't forget about garland, wreathes, plaques, and other fun holiday decorations. One thing to make life a lot easier is a light timer. You can get one for outdoor, or indoor lights. You can set it, so that your lights will come on, and go off, at a certain time. It is the best gadget you can find, for holiday coordination. If you are looking for a commercial, or an outdoor tree, Yardiac is fully stocked. Most artificial trees cannot be used outdoors. If you are looking to 'spruce' up your courtyard, look no further. You will want a commercial tree. Don't forget about your entryway. Nothing welcomes the Holiday season, like a Christmas Urn. We would love to hear about YOUR Holiday traditions, and decorating tips. Don't be shy! Share them with everyone.

Thursday, October 25, 2007

Growing Perfect Pumpkins

You can have a wonderful time learning how to grow, and care for, pumpkins. They are great fun, especially for kids. They just look neat, to begin with. They make great fall decorations, and treats, also! Growing big pumpkins is basically a matter of starting with the right seeds and providing lots of space, water, and food for the vines—the general principles behind growing any vegetable with success.
Start the Seeds
Pumpkins require a long growing season (115 days or more) and their seeds need warm soil (75–85 degrees Fahrenheit) to germinate, so it’s best to start their seeds indoors. Plant them about two or three weeks before your last expected frost. A pressed fiber or peat pot (preferably four inches in diameter) can be planted into the garden, pot and all, to avoid damage to the delicate roots. Fill the pots with a damp, sterile potting mix to within an inch of the rim, and gently firm it in. Place two seeds, pointed ends down, in each container and cover them with an inch of mix. Set the pots in a warm spot, such as on top of the refrigerator or near a stove. Check the pots daily and water when the mix is dry to the touch. (Hint: Soil Moist) As soon as the seeds sprout—usually in five days or so—place the pots on a bright windowsill, in a greenhouse, or under fluorescent light fixtures. When the first true leaves appear, thin to one plant per pot by cutting off the weaker seedling with scissors.
Prepare the Soil
While the seedlings are growing indoors, prepare the pumpkin patch. Start by choosing a sunny location, protected from strong winds. For really huge pumpkins, the vines need plenty of space; allow at least 20 feet between plants. Next, amend the soil with plenty of well-rotted manure or compost. If possible, cover the entire patch with a three-inch layer of well-rotted manure or compost, plus a sprinkling of fertilizer, such as an organic mix of blood meal, bone meal, and kelp. If you don’t have that much manure or compost on hand, concentrate what you do have into six-foot circles or hills for each plant. Till or dig the amendments into the soil.
Water. Water. Water Some More
80 to 90% of every pumpkin is water. Water is essential for nourishmening the entire plant. A major factor is the kind of soil in the patch. Sandy soil needs more water than soil with high deposits of clay. In either case, the rule of thumb is: turn off the water when puddles appear; and wait till the soil is dry on top before watering again. It is best to water the plant at the roots rather than sprinkling from above. Drip systems and soaker hoses are efficient, reasonably priced, and easy to install.
Pruning
Pumpkin vines withstand pruning quite well. Properly done, it strengthens the plant and helps it thrive. The vines are prickly, so cover your hands, arms, and legs, when pruning. Pruning focuses the energy of the plant and yields larger but, of course, fewer pumpkins. Don't be worried, if you notice that some of the pumpkins suddenly turn yellow, and drop off the vine. This is perfectly natural. It can happen for several reasons. To encourage a round shape, make sure that the pumpkin is sitting perfectly flat on the ground. Be careful not to handle them too much, though.
Have a little fun, with your pumpkin patch! When all the fuzz is gone from the pumpkin, usually around 3-4 weeks old, you can let the kids have some fun. You can scar the pumpkin, as it grows. Your imagination is the limit. Any blunt tool will work. It will run, or ooze, for the first day. After that, the design will become more noticeable, and will grow with the pumpkin.
Harvesting
Somewhere between deep yellow and fiery red, depending on the variety, you can pick your pumpkins. You will notice that the vines, and leaves are starting to look tattered, and worn. When harvesting, leave a few inches of stem. This preserves the freshness. Let them sit in the sun for about ten days. After that, you can store them in the cellar, or any cool dry place. Some people may be able to keep them until spring.
Now, the Fun Part
You can make all sorts of cakes, breads, and pies with pumpkins. If you look through your grocery store, in the produce section, sometimes you will find some good recipes. Possibly the easiest of these is roasted pumpkin seeds.
Here's How:
1 1/2 cups raw whole pumpkin seeds
2 teaspoons butter, melted
1 pinch salt
Preheat oven to 300 degrees F (150 degrees C). Toss seeds in a bowl with the melted butter and salt. Spread the seeds in a single layer on a baking sheet and bake for about 45 minutes or until golden brown; stir occasionally. Enjoy!
Please share your gardening suggestions, and pumpkin recipes here!

Tuesday, January 23, 2007

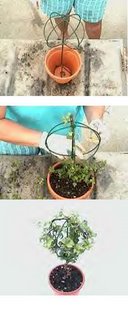
Make a Stunning Ivy Topiary

Making a topiary is a simple and rewarding project that even someone with the brownest thumb can do. The most difficult part is planning where to display the finished topiary. Having the display location predetermined will help you select the proper shape and style of your topiary form. Upon completing your selection:
  1. Place the form that you will be using in your pot. An eight to ten inch pot should be sufficient, but it all depends on the size of the form and the size of the plant that you will be using.
  2. Fill the pot with soil to about an inch from the rim.
  3. Plant the first of the ivy plugs. You will want to use three to four plugs, depending on their size.
  4. Weave the ivy around the base of the form, and continue winding up the vines. Keep adding plugs and weaving them around the form until the pot is full.
  5. Once you have planted and woven all of the plugs, sprinkle a little time release fertilizer on the surface of the soil.
In a few weeks, your topiary should be filled out and looking great.

Wednesday, December 27, 2006

Poinsettia Care

This traditional Christmas plant has undergone many improvements in recent years. Excellent new hybrids combined with professional growing techniques produce a poinsettia which will bloom beautifully through the holidays and beyond. Where to Grow Your poinsettia will appreciate a bright, sunny window, but will tolerate lower light levels. Place your plant in a spot where it will not be exposed to drafts since sudden fluctuations of temperature are stressful. Likewise, avoid locations near sources of direct heat. Flowers and their colorful bracts last longest at temperatures of 60 degrees to 70 degrees during the day and slightly cooler at night. When to Water When the soil surface feels dry to the touch, water your poinsettia thoroughly until excess water runs out drainage holes. (Poinsettias should be removed from decorative pot covers and placed in a plant saucer for watering.) After about 15 minutes, discard the excess water. Do not allow your plant to stand in the saucer of water for prolonged periods - this may result in root rot. When to Feed Fertilize regularly with a water-soluble houseplant fertilizer, preferably one recommended for blooming plants. Follow the directions on the label. Possible Problems A plant that still wilts after a thorough watering has most likely been over watered and has sustained root damage. Yellow leaves or dropping leaves may indicate either too much water, not enough water, temperatures which are too warm, or too low light. Professional horticulturists will be able to assist in the diagnosis and treatment of insects, diseases, and physiological plant disturbances. Special Note For many years poinsettias were considered poisonous plants. Many studies, including one at Ohio State University (1979) have proven that poinsettias are not poisonous to humans. However, ingesting very large quantities of stems and leaves may induce a mild digestive upset. The Consumer Products Safety Commission, after reviewing all available information, declined to require poinsettias to carry a toxic warning label.