Hello Fellow Yardiacs!
Thank you for visiting our Blog – our desire is for this to be an open forum for all outdoor garden enthusiasts. So come, read, and post often!
Troubleshooting
Why won't my peonies bloom? There are a number of factors that could prevent your peonies from blooming. The following is a list of common causes and how to avoid them. The list may seem long, but do not get discouraged; peonies are wonderfully rewarding and easy to grow if their needs are met.
Plants are young. It’s normal that young plants yield only a few short flower stems the first year of growth. Blossoms that unfold may only be a dim shadow of the full-blown beauties they may become. In the second year, flower number and form will improve until, in the third year, the bloom show will be absolutely lovely. Don’t be discouraged while you wait for your peonies to become the beauties of the garden; the plants will reward you with years of breathtaking blooms.
Soil is too dry. Peonies planted closely to established trees and shrubs may end up battling for water in the soil. If this is the case, not only will blooms fail to appear, but leaf number will also be reduced. Water plants deeply throughout the growing season to improve the odds for next year’s flower show. A soaker hoseis perfect for this task. Peonies planted too closely to trees may also be shaded too much to bloom.
Divisions buried too deeply. Eye divisions should only be planted 2 inches deep. If plants don’t bloom, the eye divisions may be more than 2 inches below soil level. Dig up divisions carefully with a perennial planter and replant them at the right depth.
Spring runs hot. If afternoons and evenings are excessively hot during the time that flower buds are forming, blossoms will abort. There’s not much you can do about that, save wait until next year.
Flower buds killed. A late frost or fungal diseasecan kill flower buds and cut off your peony’s bloom potential. If fungus is the problem, buds will be covered with fuzzy mold or rotting spots. Treat plants with a fungicide labeled for peonies.
Plants are too crowded. As peonies age and grow larger, plantings can become overcrowded, which will decrease bloom numbers. If this is the case, you'll need to dig up clumps and divide them. The best time to do this is in late summer or early fall. Cut root clumps into divisions containing at least three eye buds. Use a sharp knife. Replant divisions no more than 2 inches below the soil surface.
Too much nitrogen. Many commercial fertilizers are extremely high in nitrogen. While nitrogen is an essential element for vigorous plant growth, too much nitrogen encourages leafy growth at the expense of blooms. Try supplementing your soil with a balanced organic fertilizerfor blooming plants. You might also consider having your soil tested through your local county extention agency. This is a free service which will help provide you with valuable soil improvement suggestions.
Are peonies prone to infestation by pests or disease? Peonies are not prone to disease and the few that you might find are easily resolved. The most common are fungal diseases, which cause the buds to be covered with fuzzy mold or rotting spots. Treat with fungicide labeled for peonies. Scale infestations are a common pest in the early spring can be prevented by cutting back dead foliage after the first frost. Treat existing infestations with an application of insecticidal soap.
How can I propagate my peonies? Peony plants should be divided in the fall. Lift the rhizome and use a sharp knife to cut it into divisions with at least three eyes. Replant the divisions.
Do ants really open the buds of peonies? Although the sweet liquid that develops on the outside of peony buds causes a feeding frenzy among ants in the garden, it is a myth that the ants open the tightly closed buds. Although the ants are not benefiting the plants, they are doing no harm and are best left alone.
What should I do to get rid of the spent blossoms on my peonies? The best way to deal with old and withered flowers is to deadhead the plants. Deadheading can be done at any time of year, by cutting or pinching dead buds. You can use any hand tool, pruning shears, or even scissors -- just be sure to avoid new buds and blooms. Deadheading will freshen the appearance of your garden, as well as promote longer-lasting and more abundant blooms.
Dividing peonies Peonies grow happily for years without being disturbed, getting bigger and better with each passing year. However, they can grow too big and overcrowd other plants. Peonies eventually need to be divided, because they simply get too large for their own good--if you don’t divide them, they’ll stop blooming. In order to keep your peonies in top shape, divide them once they stop blooming (usually the third year) or if they begin to overcrowd other plants. Divide peony plants in the fall.
There are just a few easy steps to peony division. Dig area around the plant with a sharp spade. You are going to sever some roots. It’s okay--the plant will survive. Gently remove the clump from the ground and set on a drop cloth or hauling bag. Place two forks, back-to-back, in the center of the clump. Pry apart the clump into two pieces. Continue dividing each of the pieces, making sure each division section has a shoot to grow upward and roots to grow downward. (Or you can plant larger divisions, for bigger plants.) Each division should have at least three eyes.
Remove any dead or woody parts of the plant. Also, clip back about half of the foliage on the plant so that it doesn’t compete with the root system for growth. Immediately plant the divisions. You can place the mother plant back in the spot she was occupying before the division.
Waterand foliar fertilizeeach division well. In areas that receive frost, mulch around the base of the plant with shredded bark or leaves. Continue to water well (to help roots grow strong) until the ground freezes.
Supporting peonies Because peonies grow so quickly, they need a little additional support. Give them a helping hand with plant supportsto help keep the bush upright, rather than flopping onto the ground. As peonies come into full-blown bloom, the weight of each blossom can bow stems to the ground. Keep your top-heavy peonies from flopping by inserting traditional peony rings or grow-through supports into soil when stems emerge in spring. For peonies drooping under the weight of rain-heavy blossoms, simply insert y-stakes to bring stems to an erect position.
Peonies are late spring's most wonderful surprise. With embarrassingly little work, these plentiful perennials produce armloads of flowers whose heady fragrance can be detected nearly anywhere in the garden. These beautiful blooms also bridge the gap between fading late-spring borders and the blooms of summer. Peonies only require a sunny, well-protected area to grow and bloom happily for decades.
There are many types to choose from. Hybrid peonies typically bloom early in the season often in shades of pink and red. Foliage is light to medium green.
Lactiflora peonies are commonly found in the United States and usually have larger flowers and darker colored foliage than hybrid peonies.
Japanese peonies commonly have a colorful grouping of sterile stamens surrounded by one or two rows of petals. Single peonies have single-petaled flowers. Double peonies consist primarily of all petals. Anemone and Semi-double peonies are between Japanese and Double peonies in form.
Planting your peonies
Peonies are easy to plant and the buds are obvious, so it's easy to get them right side up! Remember to soak roots in a bucket or trash can of water to keep them from drying out while you digthe planting hole. Never let hair roots dry out. Do not soak for more than 8 hours.
Dig in!Dig a hole large enough to accommodate the roots without bending or crowding--about 20 to 24 inches wide and deep. Keep this topsoilin a separate pile for refilling the hole. Then scratch the sides of the hole so roots can penetrate easily. The sides of the hole should be 4 inches away from the tips of the roots when the roots are spread out in the hole. Avoid crowding the root system. (If drainage is poor, add 2 inches of gravel to the bottom of the hole.) Remember to space holes according to recommended plant spacing.
Eyes up! Remove the plant from the container of water. With sharp shears, prune any broken or damaged roots. Then place the peony plant in the hole, making sure that the red buds (which are called the "eyes") are about 1 1/2 to 2 inches below the soil’s surface. (Don’t plant too deeply or your peony may not bloom in the spring.) Spread the roots so they are not kinked or crossed. In warmer climates, plant peonies in late fall (October or November)--no more than 1 inch deep.
Watering in. Fill the hole and cover the roots with the soil from the hole. Pack the soil lightly around the roots to remove any air pockets. Water well. It’s important to provide enough water for your newly-planted peony so that the plant’s root system establishes itself well before winter. Deep waterings every 7 to 10 days are far superior to frequent light waterings. Plants need at least 1 inch of moisture each week, whether from natural rainfall or from irrigation. Try to water in the mornings.
Mulch for protection. Mulch around the plant with 2 to 4 inches straw, wood chips, lawn clippings, or other organic material to reduce evaporation and maintain moisture. Keep the area weed free!
NOTE: Within a week to 10 days, your plant should begin to show new growth. Dormancy sometimes lasts longer than anticipated; so it may take longer to see any new growth. As a general rule, it is not necessary to fertilize until new growth has begun. It is normal for young peonies to yield only a few short flower stems the first year of growth. In subsequent years, flower number and form will improve.
Plant spring blooming bulbs now! Tulips, Daffodils, Hyacinths and many other varieties of bulbs will provide your landscape with a splash of beautiful color next spring. While your planting your spring-blooming fall bulbs, be sure to dig up your Cannas, Dahlias, Gladiolus and other tender bulbs in your landscape. Remove tops and let dry for two weeks. Dust with sulfur and store in dry peat moss or vermiculite in a cool place. It is also a good time to transplant and divide Peonies and other perennials if necessary.
Now is the time to feed deciduous trees such as Oaks, Maples, Ash and Zelkovas. Use a good quality slow-release fertilizer around the "drip line" of the tree, which is an imaginary circle that runs around the tree beneath the outermost branches.
Speaking of trees, do not be alarmed when you see the interior needles on White Pines turning yellow for this is normal fall shedding. This condition causes much concern for gardeners each year. But this is a natural process that occurs on pines at this time.
There is still time to seed the lawn if you have thin areas of grass or would like to overseed the entire lawn to introduce new and improved varieties of grass seed to the lawn. In cool season areas seeding should be done by mid October. You can seed later than that, but then the seed would probably not germinate until next spring.
If you are seeding the lawn, we recommend topdressing your lawn with compost, or a 100% organic soil conditioner. Adding compost to your lawn improves soil structure, increases biological activity and soil fertility. Apply at a rate of approximately1cubic yard per 1,000 square feet.
If needed, lime lawns to raise the soil pH and add calcium and magnesium to the soil. Lawns prefer a pH range of 6.0-6.8, which typically means that we need to add lime to our soils to increase the pH. Apply lime at the rate of 40 - 50 lbs. per 1,000 square feet. If more lime is needed, it can be done again after six weeks.
If you haven't done so already, bring houseplants back indoors. It's a good idea to spray them with an insecticide and let dry before bringing them back indoors.
Plant spring blooming bulbs now! Tulips, Daffodils, Hyacinths and many other varieties of bulbs will provide your landscape with a splash of beautiful color next spring. While your planting your spring-blooming fall bulbs, be sure to dig up your Cannas, Dahlias, Gladiolus and other tender bulbs in your landscape. Remove tops and let dry for two weeks. Dust with sulfur and store in dry peat moss or vermiculite in a cool place. It is also a good time to transplant and divide Peonies and other perennials if necessary.
Now is the time to feed deciduous trees such as Oaks, Maples, Ash, and Zelkovas. Use a good quality slow-release fertilizer around the "drip line" of the tree, which is an imaginary circle that runs around the tree beneath the outermost branches.
Speaking of trees, do not be alarmed when you see the interior needles on White Pines turning yellow for this is normal fall shedding. This condition causes much concern for gardeners each year. But this is a natural process that occurs on pines at this time.
There is still time to seed the lawn if you have thin areas of grass or would like to overseed the entire lawn to introduce new and improved varieties of grass seed to the lawn. In cool season areas seeding should be done by mid October. You can seed later than that, but then the seed would probably not germinate until next spring.
If you are seeding the lawn, we recommend topdressing your lawn with compost, or a 100% organic soilconditioner. Adding compost to your lawn improves soil structure, increases biological activity and soil fertility. Apply at a rate of approximately1cubic yard per 1,000 square feet.
If needed, lime lawns to raise the soil pH and add calcium and magnesium to the soil. Lawns prefer a pH range of 6.0-6.8, which typically means that we need to add lime to our soils to increase the pH. Apply lime at the rate of 40 - 50 lbs. per 1,000 square feet. If more lime is needed, it can be done again after six weeks.
If you haven't done so already, bring houseplants back indoors. It's a good idea to spray them with an insecticide and let dry before bringing them back indoors.
 s they may become. In the second year, flower number and form will improve until, in the third year, the bloom show will be absolutely lovely. Don’t be discouraged while you wait for your peonies to become the beauties of the garden; the plants will reward you with years of breathtaking blooms.
Soil is too dry. Peonies planted closely to established trees and shrubs may end up battling for water in the soil. If this is the case, not only will blooms fail to appear, but leaf number will also be reduced. Water plants deeply throughout the growing season to improve the odds for next year’s flower show. A soaker hose is perfect for this task. Peonies planted too closely to trees may also be shaded too much to bloom.
Divisions buried too deeply. Eye divisions should only be planted 2 inches deep. If plants don’t bloom, the eye divisions may be more than 2 inches below soil level. Dig up divisions carefully with a perennial planter and replant them at the right depth.
Spring runs hot. If afternoons and evenings are excessively hot during the time that flower buds are forming, blossoms will abort. There’s not much you can do about that, save wait until next year.
Flower buds killed. A late frost or fungal disease can kill flower buds and cut off your peony’s bloom potential. If fungus is the problem, buds will be covered with fuzzy mold or rotting spots. Treat plants with a fungicide labeled for peonies.
Plants are too crowded. As peonies age and grow larger, plantings can become overcrowded, which will decrease bloom numbers. If
s they may become. In the second year, flower number and form will improve until, in the third year, the bloom show will be absolutely lovely. Don’t be discouraged while you wait for your peonies to become the beauties of the garden; the plants will reward you with years of breathtaking blooms.
Soil is too dry. Peonies planted closely to established trees and shrubs may end up battling for water in the soil. If this is the case, not only will blooms fail to appear, but leaf number will also be reduced. Water plants deeply throughout the growing season to improve the odds for next year’s flower show. A soaker hose is perfect for this task. Peonies planted too closely to trees may also be shaded too much to bloom.
Divisions buried too deeply. Eye divisions should only be planted 2 inches deep. If plants don’t bloom, the eye divisions may be more than 2 inches below soil level. Dig up divisions carefully with a perennial planter and replant them at the right depth.
Spring runs hot. If afternoons and evenings are excessively hot during the time that flower buds are forming, blossoms will abort. There’s not much you can do about that, save wait until next year.
Flower buds killed. A late frost or fungal disease can kill flower buds and cut off your peony’s bloom potential. If fungus is the problem, buds will be covered with fuzzy mold or rotting spots. Treat plants with a fungicide labeled for peonies.
Plants are too crowded. As peonies age and grow larger, plantings can become overcrowded, which will decrease bloom numbers. If  this is the case, you'll need to dig up clumps and divide them. The best time to do this is in late summer or early fall. Cut root clumps into divisions containing at least three eye buds. Use a sharp knife. Replant divisions no more than 2 inches below the soil surface.
Too much nitrogen. Many commercial fertilizers are extremely high in nitrogen. While nitrogen is an essential element for vigorous plant growth, too much nitrogen encourages leafy growth at the expense of blooms. Try supplementing your soil with a balanced organic fertilizer for blooming plants. You might also consider having your soil tested through your local county extention agency. This is a free service which will help provide you with valuable soil improvement suggestions.
Are peonies prone to infestation by pests or disease? Peonies are not prone to disease and the few that you might find are easily resolved. The most common are fungal diseases, which cause the buds to be covered with fuzzy mold or rotting spots. Treat with fungicide labeled for peonies. Scale infestations are a common pest in the early spring can be prevented by cutting back dead foliage after the first frost. Treat existing infestations with an application of insecticidal soap.
How can I propagate my peonies? Peony plants should be divided in the fall. Lift the rhizome and use a sharp knife to cut it into divisions with at least three eyes. Replant the divisions.
this is the case, you'll need to dig up clumps and divide them. The best time to do this is in late summer or early fall. Cut root clumps into divisions containing at least three eye buds. Use a sharp knife. Replant divisions no more than 2 inches below the soil surface.
Too much nitrogen. Many commercial fertilizers are extremely high in nitrogen. While nitrogen is an essential element for vigorous plant growth, too much nitrogen encourages leafy growth at the expense of blooms. Try supplementing your soil with a balanced organic fertilizer for blooming plants. You might also consider having your soil tested through your local county extention agency. This is a free service which will help provide you with valuable soil improvement suggestions.
Are peonies prone to infestation by pests or disease? Peonies are not prone to disease and the few that you might find are easily resolved. The most common are fungal diseases, which cause the buds to be covered with fuzzy mold or rotting spots. Treat with fungicide labeled for peonies. Scale infestations are a common pest in the early spring can be prevented by cutting back dead foliage after the first frost. Treat existing infestations with an application of insecticidal soap.
How can I propagate my peonies? Peony plants should be divided in the fall. Lift the rhizome and use a sharp knife to cut it into divisions with at least three eyes. Replant the divisions. Do ants really open the buds of peonies? Although the sweet liquid that develops on the outside of peony buds causes a feeding frenzy among ants in the garden, it is a myth that the ants open the tightly closed buds. Although the ants are not benefiting the plants, they are doing no harm and are best left alone.
What should I do to get rid of the spent blossoms on my peonies? The best way to deal with old and withered flowers is to deadhead the plants. Deadheading can be done at any time of year, by cutting or pinching dead buds. You can use any hand tool, pruning shears, or even scissors -- just be sure to avoid new buds and blooms. Deadheading will freshen the appearance of your garden, as well as promote longer-lasting and more abundant blooms.
Do ants really open the buds of peonies? Although the sweet liquid that develops on the outside of peony buds causes a feeding frenzy among ants in the garden, it is a myth that the ants open the tightly closed buds. Although the ants are not benefiting the plants, they are doing no harm and are best left alone.
What should I do to get rid of the spent blossoms on my peonies? The best way to deal with old and withered flowers is to deadhead the plants. Deadheading can be done at any time of year, by cutting or pinching dead buds. You can use any hand tool, pruning shears, or even scissors -- just be sure to avoid new buds and blooms. Deadheading will freshen the appearance of your garden, as well as promote longer-lasting and more abundant blooms.


 Plant spring blooming bulbs now! Tulips, Daffodils, Hyacinths and many other varieties of bulbs will provide your landscape with a splash of beautiful color next spring. While your planting your spring-blooming fall bulbs, be sure to dig up your Cannas, Dahlias, Gladiolus and other tender bulbs in your landscape. Remove tops and let dry for two weeks. Dust with
 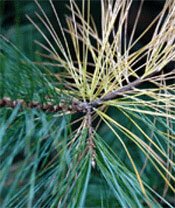 Speaking of trees, do not be alarmed when you see the interior needles on White Pines turning yellow for this is normal fall shedding. This condition causes much concern for gardeners each year. But this is a natural process that occurs on pines at this time.
There is still time to
Speaking of trees, do not be alarmed when you see the interior needles on White Pines turning yellow for this is normal fall shedding. This condition causes much concern for gardeners each year. But this is a natural process that occurs on pines at this time.
There is still time to  If needed, lime lawns to raise the soil pH and add calcium and magnesium to the soil. Lawns prefer a pH range of 6.0-6.8, which typically means that we need to add lime to our soils to increase the pH. Apply lime at the rate of 40 - 50 lbs. per 1,000 square feet. If more lime is needed, it can be done again after six weeks.
If you haven't done so already, bring houseplants back indoors. It's a good idea to spray them with an
If needed, lime lawns to raise the soil pH and add calcium and magnesium to the soil. Lawns prefer a pH range of 6.0-6.8, which typically means that we need to add lime to our soils to increase the pH. Apply lime at the rate of 40 - 50 lbs. per 1,000 square feet. If more lime is needed, it can be done again after six weeks.
If you haven't done so already, bring houseplants back indoors. It's a good idea to spray them with an  Plant spring blooming bulbs now! Tulips, Daffodils, Hyacinths and many other varieties of bulbs will provide your landscape with a splash of beautiful color next spring. While your planting your spring-blooming fall bulbs, be sure to dig up your Cannas, Dahlias, Gladiolus and other tender bulbs in your landscape. Remove tops and let dry for two weeks. Dust with
  Speaking of trees, do not be alarmed when you see the interior needles on White Pines turning yellow for this is normal fall shedding. This condition causes much concern for gardeners each year. But this is a natural process that occurs on pines at this time.
There is still time to
Speaking of trees, do not be alarmed when you see the interior needles on White Pines turning yellow for this is normal fall shedding. This condition causes much concern for gardeners each year. But this is a natural process that occurs on pines at this time.
There is still time to 


