It can be hard to find the perfect garden glove, durable, comfortable and snug, 

Thursday, January 22, 2009
The Pallina Glove


Friday, January 11, 2008
 by Emily Weathers
  re so unique that will defiantly stand out from others! You can get a castle for your prince or a 70’s style house to a Toad Spaceship. Not only are these decorative, but they will help the garden as well.
We know not all toads are cute, but they have their ways. Toads consume approximately 110 bugs a day, such as moths, beetles, slugs and other bugs that like to damage your garden. Now that's definitely help to your garden! To spoil the helper toad, you may want to add a garden light, which not only will accent the garden, it will attract moths and other night bugs that will definite interest the toad in a
re so unique that will defiantly stand out from others! You can get a castle for your prince or a 70’s style house to a Toad Spaceship. Not only are these decorative, but they will help the garden as well.
We know not all toads are cute, but they have their ways. Toads consume approximately 110 bugs a day, such as moths, beetles, slugs and other bugs that like to damage your garden. Now that's definitely help to your garden! To spoil the helper toad, you may want to add a garden light, which not only will accent the garden, it will attract moths and other night bugs that will definite interest the toad in a  snack. After a long night of snaking away, they need a cozy, moist resting place to hide during those humid summer days.
  s location daily with a watering can to keep it moist. Toads drink by soaking in water and absorbing it through their skin. Another option for a pond would be to make your own pond.
 Tuesday, December 04, 2007
Fun With Terrariums
 periods of time with a minimum amount of attention.
 moss will complete the scene. If there is space in your terrarium, you can add shallow container of water to serve as a pond.
Monday, November 19, 2007
Haws Watering Cans
 Unsatisfied with the French style watering can that dominted the industry, he set out to design the perfect watering can. -One that is perfectly balanced, and easy to carry. His patented style has remained virtually unchanged, since 1885.
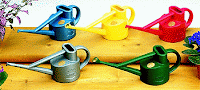 ve means of weatherproofing them. After that, they are off to be painted, polished, and sealed with the Haws insignia.
 Friday, October 26, 2007
How to Select an Artificial Christmas Tree
 o come. This is why we believe that we have found the perfect tree for you and your family; So much so we have put a 10 year warranty on the all of the Pre-Lit Trees we sell. This tree will represent Christmas for at least 15 years in your home, and maintain it's beauty for just as long.. We dare you to find a better tree. We can say in complete confidence that we sell the best artificial tree and, at the same time, you will not break the bank. The Christmas Tree Guide for Artificial Christmas Trees will help you understand the differences in Christmas trees. When purchasing Artificial Christmas Trees, keep in mind that most Christmas Trees will last around 15 years so choose wisely.
Things you should know before you buy!
Molds and Needles Our trees are molded from actual live trees. Yardiac makes shopping easier because we have an easy 'Shop by Style' (Pine, Spruce, and Frazier Fir). These trees were hand-picked by our lead designer who has been working with artificial trees for over 10 years. The material of our needles is Poly Ethylene which is used in an injected molding system to form a group of tree- like branches and needles. These branch molds use real tree branches as forms thus the needles are molded into the correct shape. A wonderful time saving advantage is that they requires little or no shaping. There are countless colors and textures available to choose from with Poly Ethylene (PE). Our tree Expert has studied every tree on the market. This research has provided valuable information resulting in the highest quality synthetic trees sold any where. We dare to compare our quality, as you will find we sell the best artificial trees. All Yardiac trees are a mixture of PE & PVC. Studies show that this preserves the realism of the trees. Fully PE, or molded, trees tend to shine, when lit. It gives a very plastic look. For the discriminating tree seeker, PE/PVC mix is the best choice.
o come. This is why we believe that we have found the perfect tree for you and your family; So much so we have put a 10 year warranty on the all of the Pre-Lit Trees we sell. This tree will represent Christmas for at least 15 years in your home, and maintain it's beauty for just as long.. We dare you to find a better tree. We can say in complete confidence that we sell the best artificial tree and, at the same time, you will not break the bank. The Christmas Tree Guide for Artificial Christmas Trees will help you understand the differences in Christmas trees. When purchasing Artificial Christmas Trees, keep in mind that most Christmas Trees will last around 15 years so choose wisely.
Things you should know before you buy!
Molds and Needles Our trees are molded from actual live trees. Yardiac makes shopping easier because we have an easy 'Shop by Style' (Pine, Spruce, and Frazier Fir). These trees were hand-picked by our lead designer who has been working with artificial trees for over 10 years. The material of our needles is Poly Ethylene which is used in an injected molding system to form a group of tree- like branches and needles. These branch molds use real tree branches as forms thus the needles are molded into the correct shape. A wonderful time saving advantage is that they requires little or no shaping. There are countless colors and textures available to choose from with Poly Ethylene (PE). Our tree Expert has studied every tree on the market. This research has provided valuable information resulting in the highest quality synthetic trees sold any where. We dare to compare our quality, as you will find we sell the best artificial trees. All Yardiac trees are a mixture of PE & PVC. Studies show that this preserves the realism of the trees. Fully PE, or molded, trees tend to shine, when lit. It gives a very plastic look. For the discriminating tree seeker, PE/PVC mix is the best choice.  Construction
Generally there are two major ways manufacturers attach the branches of artificial Christmas trees. They will either be attached to the pole or the trunk. Pole mounted trees are very hard to set up, year after year, and will never have lights.The second method is trunk mounted which is the way all of our trees are constructed. The hinged branch process on artificial Christmas trees is the quickest and easiest to assemble. All the branches are permanently attached and pre-lit. Simply fold down in correct position.
Is the Stand Important?
In a word, YES!! Make sure that you know what the artificial Christmas trees stand is made of. Common materials are plastic, metal, or wood. Our pre-lit trees include a metal stand. If there will be children or pets around the tree you need to do a tip-over test to see if the tree stand will hold a fully lit and decorated tree upright in case of an accident. Remember that a fully lit and decorated tree will be about twice as heavy. Plastic tree stands are cheaper and have a tendency to bend or break, under stress. Metal tree stands are stronger and, by far, the best.
What is the Right Size Tree?
A common
Construction
Generally there are two major ways manufacturers attach the branches of artificial Christmas trees. They will either be attached to the pole or the trunk. Pole mounted trees are very hard to set up, year after year, and will never have lights.The second method is trunk mounted which is the way all of our trees are constructed. The hinged branch process on artificial Christmas trees is the quickest and easiest to assemble. All the branches are permanently attached and pre-lit. Simply fold down in correct position.
Is the Stand Important?
In a word, YES!! Make sure that you know what the artificial Christmas trees stand is made of. Common materials are plastic, metal, or wood. Our pre-lit trees include a metal stand. If there will be children or pets around the tree you need to do a tip-over test to see if the tree stand will hold a fully lit and decorated tree upright in case of an accident. Remember that a fully lit and decorated tree will be about twice as heavy. Plastic tree stands are cheaper and have a tendency to bend or break, under stress. Metal tree stands are stronger and, by far, the best.
What is the Right Size Tree?
A common  mistake is to go out with the intention of buying the tallest, widest artificial Christmas tree you can find, only to get home and find that it doesn't fit through the door. The most important thing to consider is where are you going to display your tree. Most home ceilings are 8 feet tall. A 7.5 foot Artificial Christmas Tree will allow you to use a tree topper. If you have vaulted or custom ceilings, you may want to consider a taller tree. Our taller trees can be as tall as 12 feet which can really fill a vaulted room spectacularly. You also need to consider the amount of floor space available in the spot where you want the tree to sit. Measure between the pieces of furniture and from the wall out into the room to determine how wide a tree you can purchase. Each tree will show a diameter chart. Use it to help you determine which tree will best fit in the room of your choice.
Yardiac Christmas trees come in regular or slim widths. Full diameter (Regular) are more traditional, but if you are working with a confined area, slim trees are perfect. A tip to save money: You can use a strong wooden box under your artificial Christmas tree and it will increase the height of your tree. You will be able to disguise the booster, once you drape your tree skirt, and place your gifts. This is also helpful, because there is more room for gift boxes, and decorations, under the tree.
Once you have picked out your tree, don't forget about garland, wreathes, plaques, and other fun holiday decorations. One thing to make life a lot easier is a light timer. You can get one for outdoor, or indoor lights. You can set it, so that your lights will come on, and go off, at a certain time. It is the best gadget you can find, for holiday coordination.
mistake is to go out with the intention of buying the tallest, widest artificial Christmas tree you can find, only to get home and find that it doesn't fit through the door. The most important thing to consider is where are you going to display your tree. Most home ceilings are 8 feet tall. A 7.5 foot Artificial Christmas Tree will allow you to use a tree topper. If you have vaulted or custom ceilings, you may want to consider a taller tree. Our taller trees can be as tall as 12 feet which can really fill a vaulted room spectacularly. You also need to consider the amount of floor space available in the spot where you want the tree to sit. Measure between the pieces of furniture and from the wall out into the room to determine how wide a tree you can purchase. Each tree will show a diameter chart. Use it to help you determine which tree will best fit in the room of your choice.
Yardiac Christmas trees come in regular or slim widths. Full diameter (Regular) are more traditional, but if you are working with a confined area, slim trees are perfect. A tip to save money: You can use a strong wooden box under your artificial Christmas tree and it will increase the height of your tree. You will be able to disguise the booster, once you drape your tree skirt, and place your gifts. This is also helpful, because there is more room for gift boxes, and decorations, under the tree.
Once you have picked out your tree, don't forget about garland, wreathes, plaques, and other fun holiday decorations. One thing to make life a lot easier is a light timer. You can get one for outdoor, or indoor lights. You can set it, so that your lights will come on, and go off, at a certain time. It is the best gadget you can find, for holiday coordination.
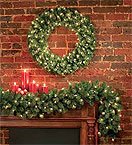 If you are looking for a commercial, or an outdoor tree, Yardiac is fully stocked. Most artificial trees cannot be used outdoors. If you are looking to 'spruce' up your courtyard, look no further. You will want a commercial tree.
Don't forget about your entryway. Nothing welcomes the Holiday season, like a Christmas Urn.
We would love to hear about YOUR Holiday traditions, and decorating tips. Don't be shy! Share them with everyone.
If you are looking for a commercial, or an outdoor tree, Yardiac is fully stocked. Most artificial trees cannot be used outdoors. If you are looking to 'spruce' up your courtyard, look no further. You will want a commercial tree.
Don't forget about your entryway. Nothing welcomes the Holiday season, like a Christmas Urn.
We would love to hear about YOUR Holiday traditions, and decorating tips. Don't be shy! Share them with everyone.
Friday, June 08, 2007
Drying Herbs
Gathering herbs for drying is one of midsummer’s most pleasant tasks. Using the heat of the season to preserve some of this bounty always makes me feel in tune with my garden. When sheared in midsummer, moist herb plants respond by growing bushier and more attractive; plants from which you take cuttings now will produce another harvest before frost. Drying herbs is not hard work, and you don’t need special equipment. A pinch of dried herbs can make a significant difference in stews, sauces, salads, and soups. You might also want to dry some mint or lemon verbena for teas, or prepare jars of dried herbs for thoughtful, personalized gifts.
- CUT THE STALKS For best flavor, pick herbs when blossoms first begin to form, but before they open—this is when their v
 olatile-oil content is highest. Wait until late morning on a sunny day, after the dew has dried. The leaves should be dry when you gather cuttings. Use scissors or pruning shears to clip off the herb stalks. It’s better to cut than to break the stems, because breaking them leaves a harder-to-heal ragged edge on the remaining stem, and tugging on the plant may disturb its roots. In most cases it’s best to remove up to two-thirds of an herb plant’s top growth. (In the fall, as frost approaches, perennial herbs such as sage should be trimmed more conservatively—perhaps by one-third to one-half—because they may not survive winter if pruned too severely late in the season.)
 - RINSE THE HERBS Now’s the time to remove any grit, dust, or other residues; you won’t want to wash the herbs after they’ve dried. Long-stemmed herbs are usually fairly clean, but creeping plants like thyme may have sand or mud clinging to their leaves. Hold muddy leaves under running water for a minute or two. If they’re just dusty, you can plunge them briefly into a bucket of clean water. Then shake off the excess water thoroughly and pat dry with paper towels, or whirl the cuttings in a mesh basket to spin off the water.
- DRY THE CUTTINGS The best drying spot is a hot, dark space with good air circulation. Herbs will dry more quickly at temperatures above 80 degrees Fahrenheit. Likely places include a garage or a shady porch. Even a hot attic, where daytime temperatures might soar into the 90s or 100s, is not too hot. The heat dehydrates the leaves before they rot, darkness ensures good color retention, and moving air carries moisture away while discouraging mold formation. Twiggy or stalky herbs (such as rosemary, thyme, and dill) with small leaves that stay separate even when the stalks are bundled together may be hung in bunches from nails or wire. Working with one or two dozen stalks at a time, tie the stems tightly together with string or fasten them together with rubber bands. String may need to be tightened periodically as the stems shrink in drying, while rubber bands will continue to hold as the bundles lose bulk. If possible, hang the bunches of herbs where air reaches them from all sides—from a rafter or ceiling hook, for example, rather than on a wall.

If you don’t have a shaded place in which to hang your herbs, pop a brown paper bag over them. Cut small slits in the bag to admit air. Large-leafed herbs (such as basil or mint) may rot before they dry if they are bundled tightly together. Such herbs will dry more quickly and retain color better if their stems are grouped in small bunches or spread in a single layer on racks or screens, propped so that air can circulate under them. (Avoid using galvanized-metal screens; plant acids may react with the metal to form toxic compounds.)
Saturday, March 10, 2007
The New Season
Friday, March 09, 2007
Weather Stations
 La Crosse Technology introduced radio-controlled clocks to the US market in 1991 and continues to be on the cutting edge of this technology in America.
The WS-9611U Wireless forecast station with Oscar outlook, this small weather station features a wealth of information at once.
This weather station monitors inside and outside temperature, inside humidity and has an atomic clock that automatically updates for daylight savings time. In addition, this weather forecaster has 15 forecast icons based on temperature and air readings, suggesting what kind of weather to expect and what to wear. (So even young children can quickly tell the forecast.) In the form of various icons, the weather boy holding an umbrella for rain, or all bundled up for the cold, or in swimsuit with the sun shining and many more.
Want to plan a walk in the moonlight? This weather forecaster also monitors moon phase, calculates sunrise and sunset based on selected city name.
This forecaster, and many others, is available at Yardiac.com.
La Crosse Technology introduced radio-controlled clocks to the US market in 1991 and continues to be on the cutting edge of this technology in America.
The WS-9611U Wireless forecast station with Oscar outlook, this small weather station features a wealth of information at once.
This weather station monitors inside and outside temperature, inside humidity and has an atomic clock that automatically updates for daylight savings time. In addition, this weather forecaster has 15 forecast icons based on temperature and air readings, suggesting what kind of weather to expect and what to wear. (So even young children can quickly tell the forecast.) In the form of various icons, the weather boy holding an umbrella for rain, or all bundled up for the cold, or in swimsuit with the sun shining and many more.
Want to plan a walk in the moonlight? This weather forecaster also monitors moon phase, calculates sunrise and sunset based on selected city name.
This forecaster, and many others, is available at Yardiac.com.
Wednesday, January 24, 2007
Do Sundials Actually Work?
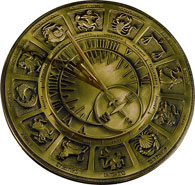 The poor reputation of sundials is ill-deserved, and has arisen mostly because we have all accepted "watch time" as an absolute standard, without devoting any thought to the nature of the time it is measuring. They're also a perfect gift!
Sundials measure time as it is. Noon is when the when the sun is highest in the sky (when it crosses the meridian). Watches measure time as we would like it to be, with noon tomorrow exactly 24 hours, 0 minutes and 0 seconds away from noon today. But noon on 26 December is actually 24 hours, 0 minutes and 29 seconds away from noon on Christmas Day. And noon on 15th September is only 23 hours, 59 minutes and 39 seconds away from noon on the following day.
Mechanical watches obviously cannot be made to run in this way. (Electronic watches could be made to do so, though the manufacturers would probably not find a very large market for them). So Mean Time was invented, an artificial construct in which all days are assumed to be exactly 24 hours long.
The sundials seen above church doors are a reminder of a time when sundials were the standard. Until about 200 years ago, public clocks could not be made sufficiently accurate to run for more than a few days without being reset, and the only way of resetting them was from a sundial.
Until the railways came, there was no particular reason why people in, say, Bristol should keep the same time as people in London. And, of course, at that time there was no practical way of communicating information about time over a distance. When the telegraph made such communication possible, it became necessary for people living in one area to agree that they would not keep their own local time, but would all keep a time based on the local standard meridian. Bristol is at 2º 35'W of Greenwich, so noon there is just over 10 minutes later than in London. There is still a relic of this change - the clock over the old Corn Exchange in Bristol has two minute hands. One shows Greenwich Mean Time like all the other clocks in England, and the other, 10 minutes behind it, shows Bristol time!
Later on, another artificial change was made with Summer Time, which arbitrarily adds one hour to all clock times during the summer.
So, in the summer, there are 3 good reasons why your watch will be telling a different time from the sundial. They may be up to 15 minutes different because your watch is assuming that all days are equal in length. Then it will be 4 minutes different for every 1degree you are east or west of your standard meridian. (This can be quite substantial; Vigo in Spain, for example is 8º44'W of Greenwich, but is on Central European Time, for which the standard meridian is 15ºE of Greenwich, so the correction for longitude in Vigo will be 1 hour 34 minutes and 56 seconds). Lastly, it will be exactly 60 minutes different because your watch, if you live in England, has been arbitrarily altered to tell the time in Prague for the duration of the summer!
Our sundials are a classic addition to any yard, and make great gifts! Not only do we have a generous selection of sundials, but also a great choice of bases. Be sure to take a look!
The poor reputation of sundials is ill-deserved, and has arisen mostly because we have all accepted "watch time" as an absolute standard, without devoting any thought to the nature of the time it is measuring. They're also a perfect gift!
Sundials measure time as it is. Noon is when the when the sun is highest in the sky (when it crosses the meridian). Watches measure time as we would like it to be, with noon tomorrow exactly 24 hours, 0 minutes and 0 seconds away from noon today. But noon on 26 December is actually 24 hours, 0 minutes and 29 seconds away from noon on Christmas Day. And noon on 15th September is only 23 hours, 59 minutes and 39 seconds away from noon on the following day.
Mechanical watches obviously cannot be made to run in this way. (Electronic watches could be made to do so, though the manufacturers would probably not find a very large market for them). So Mean Time was invented, an artificial construct in which all days are assumed to be exactly 24 hours long.
The sundials seen above church doors are a reminder of a time when sundials were the standard. Until about 200 years ago, public clocks could not be made sufficiently accurate to run for more than a few days without being reset, and the only way of resetting them was from a sundial.
Until the railways came, there was no particular reason why people in, say, Bristol should keep the same time as people in London. And, of course, at that time there was no practical way of communicating information about time over a distance. When the telegraph made such communication possible, it became necessary for people living in one area to agree that they would not keep their own local time, but would all keep a time based on the local standard meridian. Bristol is at 2º 35'W of Greenwich, so noon there is just over 10 minutes later than in London. There is still a relic of this change - the clock over the old Corn Exchange in Bristol has two minute hands. One shows Greenwich Mean Time like all the other clocks in England, and the other, 10 minutes behind it, shows Bristol time!
Later on, another artificial change was made with Summer Time, which arbitrarily adds one hour to all clock times during the summer.
So, in the summer, there are 3 good reasons why your watch will be telling a different time from the sundial. They may be up to 15 minutes different because your watch is assuming that all days are equal in length. Then it will be 4 minutes different for every 1degree you are east or west of your standard meridian. (This can be quite substantial; Vigo in Spain, for example is 8º44'W of Greenwich, but is on Central European Time, for which the standard meridian is 15ºE of Greenwich, so the correction for longitude in Vigo will be 1 hour 34 minutes and 56 seconds). Lastly, it will be exactly 60 minutes different because your watch, if you live in England, has been arbitrarily altered to tell the time in Prague for the duration of the summer!
Our sundials are a classic addition to any yard, and make great gifts! Not only do we have a generous selection of sundials, but also a great choice of bases. Be sure to take a look!
Tuesday, January 23, 2007
Make a Stunning Ivy Topiary
 can do. The most difficult part is planning where to display the finished topiary. Having the display location predetermined will help you select the proper shape and style of your topiary form. Upon completing your selection:
 - Place the form that you will be using in your pot. An eight to ten inch pot should be sufficient, but it all depends on the size of the form and the size of the plant that you will be using.
- Fill the pot with soil to about an inch from the rim.
- Plant the first of the ivy plugs. You will want to use three to four plugs, depending on their size.
- Weave the ivy around the base of the form, and continue winding up the vines. Keep adding plugs and weaving them around the form until the pot is full.
- Once you have planted and woven all of the plugs, sprinkle a little time release fertilizer on the surface of the soil.


