 We have tested a lot of gadgets and gimmicks over years that “claim to be” the rack/leaf picker up tool. I’m proud to report that this Hokie looking tool actually works.
The Amazing Rake’s primary benefit is eliminating the bending and stooping that comes with yard work. This lightweight rake is ergonomically designed rake and turns leaf collection into three easy steps:
1. Sweep and rake up any garden debris.
2. Push the slide grip down to close the rake head and collect the debris.
3. Slide the grip down again to deposit your pile into a trash bag or container
We have tested a lot of gadgets and gimmicks over years that “claim to be” the rack/leaf picker up tool. I’m proud to report that this Hokie looking tool actually works.
The Amazing Rake’s primary benefit is eliminating the bending and stooping that comes with yard work. This lightweight rake is ergonomically designed rake and turns leaf collection into three easy steps:
1. Sweep and rake up any garden debris.
2. Push the slide grip down to close the rake head and collect the debris.
3. Slide the grip down again to deposit your pile into a trash bag or container
Showing posts with label Fall Gardening. Show all posts
Showing posts with label Fall Gardening. Show all posts
Wednesday, October 07, 2009
We have tested a lot of gadgets and gimmicks over years that “claim to be” the rack/leaf picker up tool. I’m proud to report that this Hokie looking tool actually works.
The Amazing Rake’s primary benefit is eliminating the bending and stooping that comes with yard work. This lightweight rake is ergonomically designed rake and turns leaf collection into three easy steps:
1. Sweep and rake up any garden debris.
2. Push the slide grip down to close the rake head and collect the debris.
3. Slide the grip down again to deposit your pile into a trash bag or container


Friday, February 15, 2008
Learn about Grilling Safely on a Deck
 Fireplace grills are made for outdoor use, but what about on a deck. Better yet, what if the deck has a covered roof, but has open walls. These applications can be done as long as you have taken the correct precautions:
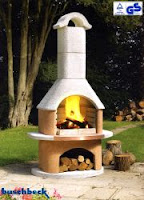
1.The deck should be rated for 400 lbs per square foot.
2. Position your grill on a stable and fireproof surface. If using a wooden deck, use some type of protective "flashing" to shield the wood deck from possible sparks or hot embers that could fall from the fire. You could use a grill pad or install some sort of tile.(an indoor fireplace should also be shielded from the floor by some type of hearth, ceramic tile, etc.).
3. Chimney extensions can be ordered to make the fireplace taller, if necessary, to extend through the roof opening.
 4.Proper insulation or separation (air space) should be employed between the chimney and the roof opening. Any licensed subcontractor who works on constructing the roof should be qualified to make this determination. The same considerations are made by carpenters building new homes (with indoor fireplaces) literally every day. The chimney does not get hot enough to be a problem unless the fireplace is overheated significantly with a fire that is much too big!
With this application you should also consider the following safety tips:
1. Always have a fire extinguisher on hand.
2. Never leave a burning product unattended, especially around children and pets, and make sure the fire is completely extinguished before leaving.
3. Check your local ordinances regarding outdoor wood burning.
4. When lighting or tending to the fire, make sure hair and clothing are away from the flame.
5. Burn only dry, seasoned wood (not treated wood) and make sure the smoke is not a nuisance to your neighbor
6.Keep all portable hearth products away from combustible material, e.g. outdoor furniture, pool towels, side of house, shrubs, etc.
7. Never use lighter fluid or gasoline to ignite your wood-burning product; use fire starters such as fibercones or lighting nuggets.
8. Be sure to make smores!
4.Proper insulation or separation (air space) should be employed between the chimney and the roof opening. Any licensed subcontractor who works on constructing the roof should be qualified to make this determination. The same considerations are made by carpenters building new homes (with indoor fireplaces) literally every day. The chimney does not get hot enough to be a problem unless the fireplace is overheated significantly with a fire that is much too big!
With this application you should also consider the following safety tips:
1. Always have a fire extinguisher on hand.
2. Never leave a burning product unattended, especially around children and pets, and make sure the fire is completely extinguished before leaving.
3. Check your local ordinances regarding outdoor wood burning.
4. When lighting or tending to the fire, make sure hair and clothing are away from the flame.
5. Burn only dry, seasoned wood (not treated wood) and make sure the smoke is not a nuisance to your neighbor
6.Keep all portable hearth products away from combustible material, e.g. outdoor furniture, pool towels, side of house, shrubs, etc.
7. Never use lighter fluid or gasoline to ignite your wood-burning product; use fire starters such as fibercones or lighting nuggets.
8. Be sure to make smores!
4.Proper insulation or separation (air space) should be employed between the chimney and the roof opening. Any licensed subcontractor who works on constructing the roof should be qualified to make this determination. The same considerations are made by carpenters building new homes (with indoor fireplaces) literally every day. The chimney does not get hot enough to be a problem unless the fireplace is overheated significantly with a fire that is much too big!
With this application you should also consider the following safety tips:
1. Always have a fire extinguisher on hand.
2. Never leave a burning product unattended, especially around children and pets, and make sure the fire is completely extinguished before leaving.
3. Check your local ordinances regarding outdoor wood burning.
4. When lighting or tending to the fire, make sure hair and clothing are away from the flame.
5. Burn only dry, seasoned wood (not treated wood) and make sure the smoke is not a nuisance to your neighbor
6.Keep all portable hearth products away from combustible material, e.g. outdoor furniture, pool towels, side of house, shrubs, etc.
7. Never use lighter fluid or gasoline to ignite your wood-burning product; use fire starters such as fibercones or lighting nuggets.
8. Be sure to make smores!Tuesday, October 16, 2007
Pruning A Large Tree Limb
The best time to remove a limb from a tree is winter, except in the cases of maples, birches, and other trees that produce copious sap. For such trees summer is a better time (in subtropical climates the  end of the dry season is preferred). If you can easily reach the limb with a ladder, there is no reason not to tackle the job yourself. However, if you’re thinking about climbing up into the branches to remove a limb, don’t. This is a dangerous task best left to professionals who have the proper training and equipment.
end of the dry season is preferred). If you can easily reach the limb with a ladder, there is no reason not to tackle the job yourself. However, if you’re thinking about climbing up into the branches to remove a limb, don’t. This is a dangerous task best left to professionals who have the proper training and equipment.
You can ensure your own safety by following a few precautions. Be certain your ladder rests on a firm base; if the ground is soft, set the ladder on some planks. Lash taller ladders to the tree and have someone hold the base of the ladder while you work. But keep other spectators away. And note where the limb will fall, making sure its drop won’t injure people or plants. If its fall might damage a valued shrub, say, tie a rope around it, pass the rope over another limb higher in the tree, and lower the cut limb slowly to the ground.
There are many reasons why you may need to remove a sizable limb from one of your trees. The limb may be damaged, diseased, or dead. It may be rubbing against another branch. Or it may just displease you; the tree would look better, you decide, without that particular branch.
Any limb with a diameter greater than one inch should be sawed. For limbs up to two inches in diameter or even slightly larger, and for limbs growing close to another, a narrow, curved pruning saw is the ideal tool and is easy to use, as it cuts by a pulling rather than a pushing action. For cutting larger limbs, a straight pruning saw with teeth on both sides of the blade can be used. But handier for most amateurs (because it can be used for jobs other than pruning ) is a bow saw, which has a detachable blade mounted on a C-shaped frame. In any case, do not use a chain saw, which is far too perilous for someone balancing on a ladder.
) is a bow saw, which has a detachable blade mounted on a C-shaped frame. In any case, do not use a chain saw, which is far too perilous for someone balancing on a ladder.Now, another way to trim your trees, is with a pruning system. You eliminate the use of ladders, which makes it a lot safer. Fred Marvin pruners are used by professionals, everywhere, but they are also available to homeowners. They are lightweight, and easy to use. They are made of high-grade steel to permit several resharpenings, for a lasting and durable pruner. You can use use longer poles, to reach higher limbs. You can use special pruner heads, for trickier pruning.
Thursday, October 11, 2007
Protect Your Foilage This Fall
Well, it is that time of year, again. The Fall is here. Winter is on its way, and food will soon be getting scarce, in the forest. That means that the deer, rabbits, and other creatures will be emerging, in search of food. The trees and shrubs that you have worked so hard to grow will be tempting the tastebuds of the woodland  creatures. It is hard to protect your foliage, when animals are hungry.

creatures. It is hard to protect your foliage, when animals are hungry.
The best way to protect your yard is to use more than one method, at the same time. You may opt for a scent and taste repellent, together.
For example, Tree Guard is a very effective taste repellent. It contains Bitrex. If you are unfamiliar with Bitrex, you may be interested to know that it was developed in the 1950s, and is commonly found in an array of household cleaners, and other items, to discourage children, or pets, from ingesting poisonous contents. It is not dangerous at all, in itself. It is just extremely bitter, and it is hard to get rid of. For use in the garden, you will find that you are training target animals to find another grazing area. Tree Guard is not the least expensive taste repeller, but it is likely the most effective. In addition, you will not find yourself reapplying every other week. It will continue to be effective for the entire season. There is onw drawback; You cannot use it on vegetables, or fruit. It will effect the taste.

If you use a scent repeller in conjunction, you may want to try a urine product. It is a non-toxic method, that tells the target animal that a very dangerous predator is in the area. This is effective because animals are born with an instinctive fear of their predators. It is a technique that has been used for hundreds of years. Urine products are easy to use. Just place 30-day dispensers or scent darts every ten to twelve feet around a perimeter. (All urines are collected naturally from domesticallyraised animals on farms that are controlled by appropriate state and federal agencies.)
Now you are all set, to greet the Fall. Put up your corn patch family. Harvest the pumpkins. Get ready for the festivities to come, and put your foliage in the back of your mind!
We love to hear from YOU!! Share your animal tips, stories, or Fall decorating ideas!
Monday, June 04, 2007
Summer & Fall Blooming Bulbs
No other plants give the gardener more beauty, or a wider range of variety, color and flowering times than flowering bulbs. They produce flowers of incredible colors from one end of the growing season to the other. No other plant rewards you with so much pleasure for so little effort.
Summer-blooming bulbs
By planting heat-loving, summer-blooming bulbs such a s begonia, canna, calla lily, dahlia, and gladiolus, you can enjoy the beauty of the tropics and open your borders to the exotic flowers and foliage of South Africa, Mexico, and other equatorial locales without leaving your own backyard
Most summer-blooming bulbs are tender bulbs, which means, in areas with sustained frost, they require lifting from the ground and storage indoors for the winter. However, you can easily use some of the inexpensive bulbs as annuals and replace them each year with other bulb varieties and colors, if you don't want to dig them up each fall. Click here for specific planting and care information for popular summer bulb varieties.
Fall-blooming bulbs
Although spring-blooming bulbs receive lots of glory and fame, a fall garden merits its own attention. Fall-blooming bulbs are unexpected, colorful additions to your garden. Grown with a backdrop of seasonal trees, fall-bloomers create a spectacular and exhilarating autumn landscape. Enjoy resurrecting your garden's brilliance with our fall-blooming varieties.
Choosing a site
Light requirements
s begonia, canna, calla lily, dahlia, and gladiolus, you can enjoy the beauty of the tropics and open your borders to the exotic flowers and foliage of South Africa, Mexico, and other equatorial locales without leaving your own backyard
Most summer-blooming bulbs are tender bulbs, which means, in areas with sustained frost, they require lifting from the ground and storage indoors for the winter. However, you can easily use some of the inexpensive bulbs as annuals and replace them each year with other bulb varieties and colors, if you don't want to dig them up each fall. Click here for specific planting and care information for popular summer bulb varieties.
Fall-blooming bulbs
Although spring-blooming bulbs receive lots of glory and fame, a fall garden merits its own attention. Fall-blooming bulbs are unexpected, colorful additions to your garden. Grown with a backdrop of seasonal trees, fall-bloomers create a spectacular and exhilarating autumn landscape. Enjoy resurrecting your garden's brilliance with our fall-blooming varieties.
Choosing a site
Light requirements
 When choosing a site for your bulbs bear in mind their preference for warmth and sunlight. Some bulbs such as caladiums prefer shade while others such as gladiolus and dahlias prefer sunny spots. Make sure to match your bulbs to the light conditions that allow them to perform their best. For light specifications, please see the plant tag or search for your plant on our site and review its "quick stats."
Soil requirements
Two of the most desirable qualities are good drainage and an abundance of organic matter (humus). You may have to promote drainage, especailly if a puddle of water stands on the site of your bed. To help determine your soil type, scoop up a handful of soil and squeeze it. If it retains the shape of your hand, you have soil with a high proportion of clay and you need to add organic matter to promote drainage. If your soil is mostly composed of clay, it may be necessary to build raised beds. If the soil doesn't hold together at all, your soil is sandy and will need organic matter to help hold moisture. The addition of organic matter and humus will be quite beneficial to the success of growing bulbs.
Garden planning
Color and time of bloom are two of the most important elements to consider when planning your bulb and garden planting. It's helpful to make a sketch of your garden before planting. Choose which bulbs to plant and their locations based on their height, color, and blooming time. In areas with sustained frost periods, keep in mind that most summer bulbs planted in spring are tender and must be dug up and stored before cold weather sets in. Mixing summer-blooming bulbs with other plants of different textures and colors gives interest in the garden beyond the blooming period.
Bulbs also need a site that is protected from the north and west winds, if possible. Wind protection will make your blooms last longer. Make sure to plant tall blooming bulbs in a protected area to prevent wind damage or plan on staking plants upright.
Determining bulb quantities
One you've chosen a site, you will need to calculate how many bulbs you will n
When choosing a site for your bulbs bear in mind their preference for warmth and sunlight. Some bulbs such as caladiums prefer shade while others such as gladiolus and dahlias prefer sunny spots. Make sure to match your bulbs to the light conditions that allow them to perform their best. For light specifications, please see the plant tag or search for your plant on our site and review its "quick stats."
Soil requirements
Two of the most desirable qualities are good drainage and an abundance of organic matter (humus). You may have to promote drainage, especailly if a puddle of water stands on the site of your bed. To help determine your soil type, scoop up a handful of soil and squeeze it. If it retains the shape of your hand, you have soil with a high proportion of clay and you need to add organic matter to promote drainage. If your soil is mostly composed of clay, it may be necessary to build raised beds. If the soil doesn't hold together at all, your soil is sandy and will need organic matter to help hold moisture. The addition of organic matter and humus will be quite beneficial to the success of growing bulbs.
Garden planning
Color and time of bloom are two of the most important elements to consider when planning your bulb and garden planting. It's helpful to make a sketch of your garden before planting. Choose which bulbs to plant and their locations based on their height, color, and blooming time. In areas with sustained frost periods, keep in mind that most summer bulbs planted in spring are tender and must be dug up and stored before cold weather sets in. Mixing summer-blooming bulbs with other plants of different textures and colors gives interest in the garden beyond the blooming period.
Bulbs also need a site that is protected from the north and west winds, if possible. Wind protection will make your blooms last longer. Make sure to plant tall blooming bulbs in a protected area to prevent wind damage or plan on staking plants upright.
Determining bulb quantities
One you've chosen a site, you will need to calculate how many bulbs you will n eed to plant to fill the space. Remember that bulbs look best in groups: A single bulb is a lonely bulb. A good rule of thumb is to plant small bulbs 4" apart (9 bulbs per square foot) and larger ones about 6" apart (4 bulbs per square foot). Therefore, to cover 25 square feet you will need approximately 225 small bulbs or 100 large ones; to cover 50 square feet you will need approximately 500 small bulbs or 200 large ones.
Planting your summer-and fall-blooming bulbs
Planting your bulbs in the garden
1. Prepare your soil. Good soil preparation is the first step to successful bulb gardening. Make sure the soil is loose and porous. Well-drained soil is a must or bulbs will rot. Turn the soil over and work organic matter such as peat moss or compost through to allow good root formation.
2. Space your bulbs. Spacing depends largely on the effect you are trying to achieve. An effective planting technique is to plant bulbs in groups or clusters rather than in individual lines. Space bulbs according to color with the softer colors in the front and the more vibrant colors in the background. Group bulbs according to height and in sequential bloom pattern for a long-lasting show of color. Also, consider how much growth is expected for larger species and give them plenty of room to avoid the task of dividing as they mature. You can also achieve a naturalized planting look by taking a handful of bulbs and tossing them in your planting area. Plant them where they land rather than in exact spaces.
3. Dig planting holes. A bulb planter makes this job a snap. The planting depth for bulbs depends on their size. A good rule of thumb is that the depth should be three times the diameter of the bulb. Cover small bulbs with 1 to 2 inches of soil; plant large bulbs 6 to 8 inches deep. (See bulb specifics on package, or your local garden center, for recommended planting depths.)
4. Work bulb food, bone meal or rock phosphate into the planting area or hole to encourage blooms and root development. Work well-rotted compost into the soil rather than directly touching the bulbs when planting.
5. Plant bulbs firmly in the soil, pointed end up, and avoid damaging fleshy roots, if present. If you are unsure which end to point up, plant the bulb sideways and it will grow in the right
eed to plant to fill the space. Remember that bulbs look best in groups: A single bulb is a lonely bulb. A good rule of thumb is to plant small bulbs 4" apart (9 bulbs per square foot) and larger ones about 6" apart (4 bulbs per square foot). Therefore, to cover 25 square feet you will need approximately 225 small bulbs or 100 large ones; to cover 50 square feet you will need approximately 500 small bulbs or 200 large ones.
Planting your summer-and fall-blooming bulbs
Planting your bulbs in the garden
1. Prepare your soil. Good soil preparation is the first step to successful bulb gardening. Make sure the soil is loose and porous. Well-drained soil is a must or bulbs will rot. Turn the soil over and work organic matter such as peat moss or compost through to allow good root formation.
2. Space your bulbs. Spacing depends largely on the effect you are trying to achieve. An effective planting technique is to plant bulbs in groups or clusters rather than in individual lines. Space bulbs according to color with the softer colors in the front and the more vibrant colors in the background. Group bulbs according to height and in sequential bloom pattern for a long-lasting show of color. Also, consider how much growth is expected for larger species and give them plenty of room to avoid the task of dividing as they mature. You can also achieve a naturalized planting look by taking a handful of bulbs and tossing them in your planting area. Plant them where they land rather than in exact spaces.
3. Dig planting holes. A bulb planter makes this job a snap. The planting depth for bulbs depends on their size. A good rule of thumb is that the depth should be three times the diameter of the bulb. Cover small bulbs with 1 to 2 inches of soil; plant large bulbs 6 to 8 inches deep. (See bulb specifics on package, or your local garden center, for recommended planting depths.)
4. Work bulb food, bone meal or rock phosphate into the planting area or hole to encourage blooms and root development. Work well-rotted compost into the soil rather than directly touching the bulbs when planting.
5. Plant bulbs firmly in the soil, pointed end up, and avoid damaging fleshy roots, if present. If you are unsure which end to point up, plant the bulb sideways and it will grow in the right  direction. Cover bulbs with soil.
6. Water well. If the weather is dry, water the bulbs regularly during the growing period.
7. Label your bulbs as you plant them. Use labels that are big enough so that two to three inches of the label is below the soil level. Labeling is a great way to remember which varieties you planted.
8. Mulch with shredded leaves or bark to conserve moisture, maintain soil temperature, and suppress weeds.
Planting your bulbs in containers
A patio, deck, balcony or entryway can provide enough space for a productive, attractive bulb display. Summer-blooming bulbs such as gladiolus, begonia, and dahlia are suited for container gardening. Fall-blooming colchicums sprout and flower easily on a sunny windowsill. If combining bulbs in one container, remember to combine only those that have similar cultural requirements. Enjoy the fun of creating a signature look for your patio, terrace, deck, balcony or entryway with container gardening!
NOTE: To overwinter tender bulbs grown in containers, leave the bulbs in the containers they grew in over the summer. Store them where the temperature will remain between 50-65° F, until new growth commences in the spring. Keep the soil slightly damp. When the bulb is dormant, or resting, it doesn't require as much water as during its active growing season. (Overwatering may cause bulbs to rot.)
direction. Cover bulbs with soil.
6. Water well. If the weather is dry, water the bulbs regularly during the growing period.
7. Label your bulbs as you plant them. Use labels that are big enough so that two to three inches of the label is below the soil level. Labeling is a great way to remember which varieties you planted.
8. Mulch with shredded leaves or bark to conserve moisture, maintain soil temperature, and suppress weeds.
Planting your bulbs in containers
A patio, deck, balcony or entryway can provide enough space for a productive, attractive bulb display. Summer-blooming bulbs such as gladiolus, begonia, and dahlia are suited for container gardening. Fall-blooming colchicums sprout and flower easily on a sunny windowsill. If combining bulbs in one container, remember to combine only those that have similar cultural requirements. Enjoy the fun of creating a signature look for your patio, terrace, deck, balcony or entryway with container gardening!
NOTE: To overwinter tender bulbs grown in containers, leave the bulbs in the containers they grew in over the summer. Store them where the temperature will remain between 50-65° F, until new growth commences in the spring. Keep the soil slightly damp. When the bulb is dormant, or resting, it doesn't require as much water as during its active growing season. (Overwatering may cause bulbs to rot.)
s begonia, canna, calla lily, dahlia, and gladiolus, you can enjoy the beauty of the tropics and open your borders to the exotic flowers and foliage of South Africa, Mexico, and other equatorial locales without leaving your own backyard
Most summer-blooming bulbs are tender bulbs, which means, in areas with sustained frost, they require lifting from the ground and storage indoors for the winter. However, you can easily use some of the inexpensive bulbs as annuals and replace them each year with other bulb varieties and colors, if you don't want to dig them up each fall. Click here for specific planting and care information for popular summer bulb varieties.
Fall-blooming bulbs
Although spring-blooming bulbs receive lots of glory and fame, a fall garden merits its own attention. Fall-blooming bulbs are unexpected, colorful additions to your garden. Grown with a backdrop of seasonal trees, fall-bloomers create a spectacular and exhilarating autumn landscape. Enjoy resurrecting your garden's brilliance with our fall-blooming varieties.
Choosing a site
Light requirements
When choosing a site for your bulbs bear in mind their preference for warmth and sunlight. Some bulbs such as caladiums prefer shade while others such as gladiolus and dahlias prefer sunny spots. Make sure to match your bulbs to the light conditions that allow them to perform their best. For light specifications, please see the plant tag or search for your plant on our site and review its "quick stats."
Soil requirements
Two of the most desirable qualities are good drainage and an abundance of organic matter (humus). You may have to promote drainage, especailly if a puddle of water stands on the site of your bed. To help determine your soil type, scoop up a handful of soil and squeeze it. If it retains the shape of your hand, you have soil with a high proportion of clay and you need to add organic matter to promote drainage. If your soil is mostly composed of clay, it may be necessary to build raised beds. If the soil doesn't hold together at all, your soil is sandy and will need organic matter to help hold moisture. The addition of organic matter and humus will be quite beneficial to the success of growing bulbs.
Garden planning
Color and time of bloom are two of the most important elements to consider when planning your bulb and garden planting. It's helpful to make a sketch of your garden before planting. Choose which bulbs to plant and their locations based on their height, color, and blooming time. In areas with sustained frost periods, keep in mind that most summer bulbs planted in spring are tender and must be dug up and stored before cold weather sets in. Mixing summer-blooming bulbs with other plants of different textures and colors gives interest in the garden beyond the blooming period.
Bulbs also need a site that is protected from the north and west winds, if possible. Wind protection will make your blooms last longer. Make sure to plant tall blooming bulbs in a protected area to prevent wind damage or plan on staking plants upright.
Determining bulb quantities
One you've chosen a site, you will need to calculate how many bulbs you will need to plant to fill the space. Remember that bulbs look best in groups: A single bulb is a lonely bulb. A good rule of thumb is to plant small bulbs 4" apart (9 bulbs per square foot) and larger ones about 6" apart (4 bulbs per square foot). Therefore, to cover 25 square feet you will need approximately 225 small bulbs or 100 large ones; to cover 50 square feet you will need approximately 500 small bulbs or 200 large ones.
Planting your summer-and fall-blooming bulbs
Planting your bulbs in the garden
1. Prepare your soil. Good soil preparation is the first step to successful bulb gardening. Make sure the soil is loose and porous. Well-drained soil is a must or bulbs will rot. Turn the soil over and work organic matter such as peat moss or compost through to allow good root formation.
2. Space your bulbs. Spacing depends largely on the effect you are trying to achieve. An effective planting technique is to plant bulbs in groups or clusters rather than in individual lines. Space bulbs according to color with the softer colors in the front and the more vibrant colors in the background. Group bulbs according to height and in sequential bloom pattern for a long-lasting show of color. Also, consider how much growth is expected for larger species and give them plenty of room to avoid the task of dividing as they mature. You can also achieve a naturalized planting look by taking a handful of bulbs and tossing them in your planting area. Plant them where they land rather than in exact spaces.
3. Dig planting holes. A bulb planter makes this job a snap. The planting depth for bulbs depends on their size. A good rule of thumb is that the depth should be three times the diameter of the bulb. Cover small bulbs with 1 to 2 inches of soil; plant large bulbs 6 to 8 inches deep. (See bulb specifics on package, or your local garden center, for recommended planting depths.)
4. Work bulb food, bone meal or rock phosphate into the planting area or hole to encourage blooms and root development. Work well-rotted compost into the soil rather than directly touching the bulbs when planting.
5. Plant bulbs firmly in the soil, pointed end up, and avoid damaging fleshy roots, if present. If you are unsure which end to point up, plant the bulb sideways and it will grow in the right  direction. Cover bulbs with soil.
6. Water well. If the weather is dry, water the bulbs regularly during the growing period.
7. Label your bulbs as you plant them. Use labels that are big enough so that two to three inches of the label is below the soil level. Labeling is a great way to remember which varieties you planted.
8. Mulch with shredded leaves or bark to conserve moisture, maintain soil temperature, and suppress weeds.
Planting your bulbs in containers
A patio, deck, balcony or entryway can provide enough space for a productive, attractive bulb display. Summer-blooming bulbs such as gladiolus, begonia, and dahlia are suited for container gardening. Fall-blooming colchicums sprout and flower easily on a sunny windowsill. If combining bulbs in one container, remember to combine only those that have similar cultural requirements. Enjoy the fun of creating a signature look for your patio, terrace, deck, balcony or entryway with container gardening!
NOTE: To overwinter tender bulbs grown in containers, leave the bulbs in the containers they grew in over the summer. Store them where the temperature will remain between 50-65° F, until new growth commences in the spring. Keep the soil slightly damp. When the bulb is dormant, or resting, it doesn't require as much water as during its active growing season. (Overwatering may cause bulbs to rot.)
direction. Cover bulbs with soil.
6. Water well. If the weather is dry, water the bulbs regularly during the growing period.
7. Label your bulbs as you plant them. Use labels that are big enough so that two to three inches of the label is below the soil level. Labeling is a great way to remember which varieties you planted.
8. Mulch with shredded leaves or bark to conserve moisture, maintain soil temperature, and suppress weeds.
Planting your bulbs in containers
A patio, deck, balcony or entryway can provide enough space for a productive, attractive bulb display. Summer-blooming bulbs such as gladiolus, begonia, and dahlia are suited for container gardening. Fall-blooming colchicums sprout and flower easily on a sunny windowsill. If combining bulbs in one container, remember to combine only those that have similar cultural requirements. Enjoy the fun of creating a signature look for your patio, terrace, deck, balcony or entryway with container gardening!
NOTE: To overwinter tender bulbs grown in containers, leave the bulbs in the containers they grew in over the summer. Store them where the temperature will remain between 50-65° F, until new growth commences in the spring. Keep the soil slightly damp. When the bulb is dormant, or resting, it doesn't require as much water as during its active growing season. (Overwatering may cause bulbs to rot.)
Saturday, October 28, 2006
Ornamental Kales for Fall Color
 Ornamental cabbage, or flowering kales, are wonderful plants to add color to the fall landscape. Not only are the plants great for outstanding color, but the leaves can serve as a garnish or edible underlay on salad platters.
The blue-green leaves are showy and open from the center; centers are usually white or tinged with pink, red, or purple. Using two different cultivars provides contrast and interest in a planting. Plant as a massed planting or use as specimen plants.
Kale is tolerant of cold temperatures, and is especially sweet, following a light frost. Production is mainly from Norfolk, Virginia to Long Island, New York where it can be spread over a long, mild winter season. Smaller production areas are scattered throughout the U. S.
The ornamental cabbages look much the same as an edible cabbage, while the kales tend to have a more unfolded, fancy or cut leaf.
There are two main planting times for ornamental cabbage, and kale, in the fall. The first is late August through September (about the same time as fall garden mums); the second is after garden mums have finished flowering or have been frosted out, usually mid- to late October. Plants may also be set out in the spring and allowed to grow in place for nearly a year.
Ornamental cabbage, or flowering kales, are wonderful plants to add color to the fall landscape. Not only are the plants great for outstanding color, but the leaves can serve as a garnish or edible underlay on salad platters.
The blue-green leaves are showy and open from the center; centers are usually white or tinged with pink, red, or purple. Using two different cultivars provides contrast and interest in a planting. Plant as a massed planting or use as specimen plants.
Kale is tolerant of cold temperatures, and is especially sweet, following a light frost. Production is mainly from Norfolk, Virginia to Long Island, New York where it can be spread over a long, mild winter season. Smaller production areas are scattered throughout the U. S.
The ornamental cabbages look much the same as an edible cabbage, while the kales tend to have a more unfolded, fancy or cut leaf.
There are two main planting times for ornamental cabbage, and kale, in the fall. The first is late August through September (about the same time as fall garden mums); the second is after garden mums have finished flowering or have been frosted out, usually mid- to late October. Plants may also be set out in the spring and allowed to grow in place for nearly a year.
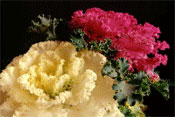 Generally, plants range from 10"-15" in height. They grow best in full sun, and moist, well-drained, soil. Low nitrogen rates will increase foliage coloration.
For a great selection of plant care products, visit Yardiac.com.
Generally, plants range from 10"-15" in height. They grow best in full sun, and moist, well-drained, soil. Low nitrogen rates will increase foliage coloration.
For a great selection of plant care products, visit Yardiac.com.
Fall Pond Preparation
 Attention Water Garden aficionados!
Fall is the time to cover ponds with netting to exclude fallen tree leaves. Your tropical lilies will continue to bloom until frost; remember top keep them fertilized to encourage strong blooming. Also, periodically remove the older, yellow leaves and spent flower heads of tropical lilies.
Watch out for the LEAFMINER!! The water lily leafminer is a common pest that produces serpentine mines in leaves. The pest is easily eradicated by simply removing and discarding affected leaves.
Attention Water Garden aficionados!
Fall is the time to cover ponds with netting to exclude fallen tree leaves. Your tropical lilies will continue to bloom until frost; remember top keep them fertilized to encourage strong blooming. Also, periodically remove the older, yellow leaves and spent flower heads of tropical lilies.
Watch out for the LEAFMINER!! The water lily leafminer is a common pest that produces serpentine mines in leaves. The pest is easily eradicated by simply removing and discarding affected leaves.
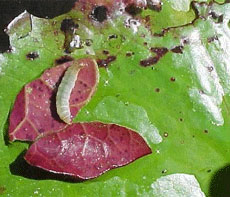 The china mark moth larva is another pest of lilies. The larvae live in small pockets of leaf tissue and float on the pond eating holes in the edge of lily pads. Pick off and dispose of the affected foliage. As always, avoid spraying pesticides around your pond. Aquatic plants and animals are very sensitive to chemical sprays.
Now for the fun part -- October is a good time to clean out excessive plant growth in your pond and remove dead or diseased leaves. Interested in netting and supplies your Water Garden? See Yardiac.com, for our selection!
The china mark moth larva is another pest of lilies. The larvae live in small pockets of leaf tissue and float on the pond eating holes in the edge of lily pads. Pick off and dispose of the affected foliage. As always, avoid spraying pesticides around your pond. Aquatic plants and animals are very sensitive to chemical sprays.
Now for the fun part -- October is a good time to clean out excessive plant growth in your pond and remove dead or diseased leaves. Interested in netting and supplies your Water Garden? See Yardiac.com, for our selection!
Friday, September 29, 2006
October Gardening Tips
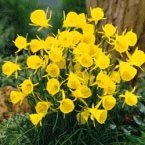 Plant spring blooming bulbs now! Tulips, Daffodils, Hyacinths and many other varieties of bulbs will provide your landscape with a splash of beautiful color next spring. While your planting your spring-blooming fall bulbs, be sure to dig up your Cannas, Dahlias, Gladiolus and other tender bulbs in your landscape. Remove tops and let dry for two weeks. Dust with sulfur and store in dry peat moss or vermiculite in a cool place. It is also a good time to transplant and divide Peonies and other perennials if necessary.
Now is the time to feed deciduous trees such as Oaks, Maples, Ash and Zelkovas. Use a good quality slow-release fertilizer around the "drip line" of the tree, which is an imaginary circle that runs around the tree beneath the outermost branches.
Plant spring blooming bulbs now! Tulips, Daffodils, Hyacinths and many other varieties of bulbs will provide your landscape with a splash of beautiful color next spring. While your planting your spring-blooming fall bulbs, be sure to dig up your Cannas, Dahlias, Gladiolus and other tender bulbs in your landscape. Remove tops and let dry for two weeks. Dust with sulfur and store in dry peat moss or vermiculite in a cool place. It is also a good time to transplant and divide Peonies and other perennials if necessary.
Now is the time to feed deciduous trees such as Oaks, Maples, Ash and Zelkovas. Use a good quality slow-release fertilizer around the "drip line" of the tree, which is an imaginary circle that runs around the tree beneath the outermost branches.
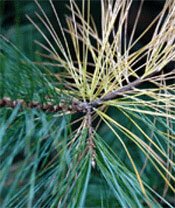 Speaking of trees, do not be alarmed when you see the interior needles on White Pines turning yellow for this is normal fall shedding. This condition causes much concern for gardeners each year. But this is a natural process that occurs on pines at this time.
There is still time to seed the lawn if you have thin areas of grass or would like to overseed the entire lawn to introduce new and improved varieties of grass seed to the lawn. In cool season areas seeding should be done by mid October. You can seed later than that, but then the seed would probably not germinate until next spring.
If you are seeding the lawn, we recommend topdressing your lawn with compost, or a 100% organic soil conditioner. Adding compost to your lawn improves soil structure, increases biological activity and soil fertility. Apply at a rate of approximately1cubic yard per 1,000 square feet.
Speaking of trees, do not be alarmed when you see the interior needles on White Pines turning yellow for this is normal fall shedding. This condition causes much concern for gardeners each year. But this is a natural process that occurs on pines at this time.
There is still time to seed the lawn if you have thin areas of grass or would like to overseed the entire lawn to introduce new and improved varieties of grass seed to the lawn. In cool season areas seeding should be done by mid October. You can seed later than that, but then the seed would probably not germinate until next spring.
If you are seeding the lawn, we recommend topdressing your lawn with compost, or a 100% organic soil conditioner. Adding compost to your lawn improves soil structure, increases biological activity and soil fertility. Apply at a rate of approximately1cubic yard per 1,000 square feet.
 If needed, lime lawns to raise the soil pH and add calcium and magnesium to the soil. Lawns prefer a pH range of 6.0-6.8, which typically means that we need to add lime to our soils to increase the pH. Apply lime at the rate of 40 - 50 lbs. per 1,000 square feet. If more lime is needed, it can be done again after six weeks.
If you haven't done so already, bring houseplants back indoors. It's a good idea to spray them with an insecticide and let dry before bringing them back indoors.
If needed, lime lawns to raise the soil pH and add calcium and magnesium to the soil. Lawns prefer a pH range of 6.0-6.8, which typically means that we need to add lime to our soils to increase the pH. Apply lime at the rate of 40 - 50 lbs. per 1,000 square feet. If more lime is needed, it can be done again after six weeks.
If you haven't done so already, bring houseplants back indoors. It's a good idea to spray them with an insecticide and let dry before bringing them back indoors.
Friday, February 17, 2006
Ornamental Kales for Fall Color

The blue-green leaves are showy and open from the center; centers are usually white or tinged with pink, red, or purple. Using two different cultivars provides contrast and interest in a planting. Plant as a massed planting or use as specimen plants.
Kale is tolerant of cold temperatures, and is especially sweet, following a light frost. Production is mainly from Norfolk, Virginia to Long Island, New York where it can be spread over a long, mild winter season. Smaller production areas are scattered throughout the U. S. The ornamental cabbages look much the same as an edible cabbage, while the kales tend to have a more unfolded, fancy or cut leaf.

Generally, plants range from 10"-15" in height. They grow best in full sun, and moist, well-drained, soil. Low nitrogen rates will increase foliage coloration.
For a great selection of plant care products, visit Yardiac.com.
October Gardening Tips
 Plant spring blooming bulbs now! Tulips, Daffodils, Hyacinths and many other varieties of bulbs will provide your landscape with a splash of beautiful color next spring. While your planting your spring-blooming fall bulbs, be sure to dig up your Cannas, Dahlias, Gladiolus and other tender bulbs in your landscape. Remove tops and let dry for two weeks. Dust with sulfur and store in dry peat moss or vermiculite in a cool place. It is also a good time to transplant and divide Peonies and other perennials if necessary.
Now is the time to feed deciduous trees such as Oaks, Maples, Ash, and Zelkovas. Use a good quality slow-release fertilizer around the "drip line" of the tree, which is an imaginary circle that runs around the tree beneath the outermost branches.
Plant spring blooming bulbs now! Tulips, Daffodils, Hyacinths and many other varieties of bulbs will provide your landscape with a splash of beautiful color next spring. While your planting your spring-blooming fall bulbs, be sure to dig up your Cannas, Dahlias, Gladiolus and other tender bulbs in your landscape. Remove tops and let dry for two weeks. Dust with sulfur and store in dry peat moss or vermiculite in a cool place. It is also a good time to transplant and divide Peonies and other perennials if necessary.
Now is the time to feed deciduous trees such as Oaks, Maples, Ash, and Zelkovas. Use a good quality slow-release fertilizer around the "drip line" of the tree, which is an imaginary circle that runs around the tree beneath the outermost branches.
 Speaking of trees, do not be alarmed when you see the interior needles on White Pines turning yellow for this is normal fall shedding. This condition causes much concern for gardeners each year. But this is a natural process that occurs on pines at this time.
There is still time to seed the lawn if you have thin areas of grass or would like to overseed the entire lawn to introduce new and improved varieties of grass seed to the lawn. In cool season areas seeding should be done by mid October. You can seed later than that, but then the seed would probably not germinate until next spring.
Speaking of trees, do not be alarmed when you see the interior needles on White Pines turning yellow for this is normal fall shedding. This condition causes much concern for gardeners each year. But this is a natural process that occurs on pines at this time.
There is still time to seed the lawn if you have thin areas of grass or would like to overseed the entire lawn to introduce new and improved varieties of grass seed to the lawn. In cool season areas seeding should be done by mid October. You can seed later than that, but then the seed would probably not germinate until next spring.
 If you are seeding the lawn, we recommend topdressing your lawn with compost, or a 100% organic soil conditioner. Adding compost to your lawn improves soil structure, increases biological activity and soil fertility. Apply at a rate of approximately1cubic yard per 1,000 square feet.
If needed, lime lawns to raise the soil pH and add calcium and magnesium to the soil. Lawns prefer a pH range of 6.0-6.8, which typically means that we need to add lime to our soils to increase the pH. Apply lime at the rate of 40 - 50 lbs. per 1,000 square feet. If more lime is needed, it can be done again after six weeks.
If you haven't done so already, bring houseplants back indoors. It's a good idea to spray them with an insecticide and let dry before bringing them back indoors.
If you are seeding the lawn, we recommend topdressing your lawn with compost, or a 100% organic soil conditioner. Adding compost to your lawn improves soil structure, increases biological activity and soil fertility. Apply at a rate of approximately1cubic yard per 1,000 square feet.
If needed, lime lawns to raise the soil pH and add calcium and magnesium to the soil. Lawns prefer a pH range of 6.0-6.8, which typically means that we need to add lime to our soils to increase the pH. Apply lime at the rate of 40 - 50 lbs. per 1,000 square feet. If more lime is needed, it can be done again after six weeks.
If you haven't done so already, bring houseplants back indoors. It's a good idea to spray them with an insecticide and let dry before bringing them back indoors.
Subscribe to:
Posts (Atom)


