Herbs have been cultivated for thousands of years for both their culinary and medicinal purposes. These fragrant and flavorful plants still play an important role in every kitchen garden. Even a tiny plot can provide you with enough herbs to use fresh, frozen, or dried.
Herbs are easy to raise, even if you've never gardened before. If you have the space, you can plant a formal herb garden that is both attractive and plentiful. Formal herb gardens use design techniques that are centuries old. Knot gardens, for example, where herbs are grown in a knot-like design, have been popular since medieval times. If you are short on space, however, you can tuck your favorite herbs amid other plantings in your vegetable or flower garden. Many low-growing herbs, such as creeping rosemary and thyme make lovely edging plants for vegetable or flower gardens. In our Test Gardens, we always edge our rose borders with lavender or variegated sage and our vegetable beds with parsley.
Annual Herbs Before planting, it is helpful to note if your plant is a perennial or an annual. Annuals are those plants that complete their entire life cycle in one year or growing season. Annual herbs are generally planted in the spring, although some, such as cilantro, parsley, and chamomile, are planted in the fall in mild-winter areas. The list of annual herbs includes summer savory, basil, borage, and dill.
Biennial Herbs Biennial herbs produce green, leafy growth the first year and begin to flower and set seed in the second. Then the plant dies to be replaced by plants from germinating seed. Parsley and mullein are examples of biennial herbs.
Perennial Herbs Perennials are plants that come back year after year—though some live longer than others. Perennial is a relative word, and a plant that is perennial in Dallas, Texas, may be treated as an annual or tender perennial in Des Moines, Iowa. Examples of perennial herbs include oreganos, mints, thymes, chives, French tarragon, winter savory, culinary sages, English lavenders, germanders, catnips, and santolinas.
Tender Perennials Tender perennials are plants that can live for several years but are not frost-tolerant. Tender perennial herbs include French lavender, rosemary, scented geraniums, pennyroyal, lemongrass, bay laurel, myrtle, capers, patchouli, curry, and licorice. These may be grown in containers or in the garden during the growing season and then overwintered indoors. Some scented geraniums varieties can withstand mild frosts in gardens in Zones 5 to 7.
Choosing a planting site
Herbs can be part of any garden or landscape as long as their specific planting requirements are met.
Sun requirements For the most part, your herbs should be planted in areas that receive 6 to 8 hours of sun a day and are protected from drying winds. A few herbs like mints, chervil, and woodruff tolerate partial shade. Cardamom grows best in shade.
Soil requirements Herbs perform best in well-drained soil. Most herbs thrive in neutral soil (pH 6.8 to 7.2). How do you tell if your soil is well-drained? Spray the garden area with a hose. If the water pools, then you need to improve the drainage of your soil. Forking in sand and other soil amendments such as compost or well-rotted manure improves drainage and boosts the nutrient level in your soil.
Container growing City dwellers can grow most herbs successfully in patio, porch or balcony containers. Care must be taken, however, to use good quality potting soil and to select pots or planters with adequate drainage holes.
Planting your herbs
Preparing the planting site
- Add a complete fertilizer to your chosen site. Use a digging fork to incorporate it into the top 2 to 3 inches of soil and to bring oxygen to the deeper layers of the soil.
- Move the containers around your site until you find the best placement for your plants, keeping their spacing requirements in mind. Staggering the planting will make the most of the garden space in addition to giving a more natural look. Planting in blocks can conserve valuable space.
- Water the garden beds the day before transplanting.
Planting herbs outdoors In the fall, you can safely transplant up to 3 weeks before your area's average first-frost date. In the spring, do not plant herbs until all danger of frost has passed. If your area might experience an unexpected cold snap after planting, protect your plants with a floating row covers or even an old blanket. If your area is unusually hot, continue to protect your plants until temperatures moderate.
- Water your plants several hours before planting so that the the rootball will be moist, but not soggy.
- Plant on a cloudy day or wait until early evening in order to prevent excessive moisture loss due to evaporation. If this is not possible, temporarily cover your plants with shade cloth, a floating row cover, or even a cloth tent to shield them from sun until the roots are able to access water and supply it to the top growth.
- Use a trowel to dig a hole in the soil. The hole should be somewhat larger than the plant's shipping pot. If you did not amend your soil already, add a handful of rock phosphate or bone meal to the bottom of the hole to boost future blooming and fruiting.
- Space the planting holes according to spacing requirements. If rosemary is a perennial in your area, allow 2 to 3 feet of space around each plant. Control plants that grow and spread rapidly (such as most mints) by planting them in large (12-inch) plastic pots sunk into the ground or situate the plants in a place where they can spread freely.
- Release the plant from the pot by straddling the stem with your fingers and inverting the pot. Gently squeeze the container and tap it lightly to separate the rootball from the sides of the pot. Avoid pulling the plant out by the stem because permanent damage may occur. Then use a fork to "scratch" the rootball and gently loosen the roots.
- Carefully set the plant in the soil at the same depth it was planted in its grower's container.
- Lightly firm the soil around the roots to remove any air pockets.
- Label each plant with a plant marker.
- Water the soil until it is evenly moist but not saturated. In general, water your plants before they become completely dry, but not so often that the soil stays soggy. After plants are well-established, a deep watering (that is, soil wetted 8 to 12 inches below the surface) every week to 10 days should suffice for most areas and conditions. Early morning watering is preferable.
- Mulch the beds with organic matter in the spring once the soil has warmed or in the fall once the seedlings have begun to grow. Keep mulch several inches away from the stem or crown of the plant. Spread the mulch as soon as the seedlings are several inches high.
- Fertilize at monthly intervals during the growing season (March through October).
- Pinch the growing tips early in the growing season to help encourage fuller growth and a larger harvest later on. Prune on a regular basis with pruning shears or scissors.
- Cultivate occasionally to help keep weeds in check and to loosen the topsoil, allowing for better water absorption. Avoid damaging surface roots.
- Transplant tender herbs from the garden into pots three weeks before the first frost and keep them indoors for the winter.
Transplanting herbs If your plants arrive in the spring, you may move them outside on warm days to a shady spot, but do not move them to permanent homes outdoors until all danger of frost is past.
If your plants arrive in the fall and are intended for outdoor planting, they can be safely transplanted up to three weeks before the first frost. If they are intended for indoor gardening, they can be transplanted into larger containers within a few days.
Container gardening with herbs Pot size will vary from species to species. Generally speaking, a 6"-8" terracotta pot, filled with good quality potting medium, suffices for a one plant, one season container garden. Do not use garden soil in any pot. Most herbs require 6-8 hours of direct sunlight or 12 hours under a grow light each day to thrive. Mints and some thymes can get by on less light. Regular pinching of growing tips encourages bushier growth.
Herb care tips
Caring for perennial herbs
Perennial herbs come back year after year and can be planted directly in the garden. Most oreganos, mints, thymes, chives, French tarragon, winter savory, culinary sages, English lavenders, germanders, catnips and santolinas are perennials. Although lavenders require a well-drained, slightly alkaline soil, most other are not picky about soil type. They do however need plenty of room - at least 12-18" between plants. Mints require special attention because they grow and spread rapidly. We recommend confining them in large 12" rubber pots sunk into the ground, or situating them at some distance from your other valuable plants. They can easily take over a small garden if not controlled in some way.
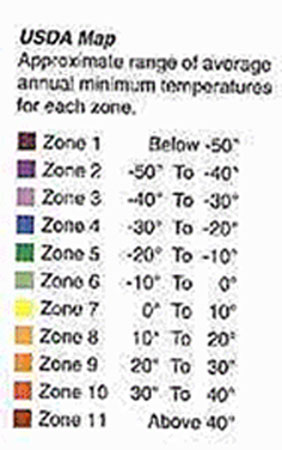
Perennial is a relative word, and a plant that is relatively perennial in Dallas may have to be treated as a tender perennial in Iowa. The US Department of Agriculture has developed a hardiness zone chart which is widely used by American gardeners, and which is referenced by virtually all commercial growers. If you are not familiar with these hardiness zones, or do not know in which zone you live, Caring for tender perennialsTender perennials are not frost tolerant but can live for several years if given proper care. Tender perennial herbs include French lavenders, rosemarys, scented geraniums, pennyroyals, lemongrass, bay laurel, myrtles, capers, patchouli, curry, licorice and several others. If you want your tender perennial herbs to last more than one season, plant them in 8-10" terra-cotta pots, and either sink the pots up to the rim in your garden, or place the pots on your porch or patio. In the fall, three weeks before your first frost, they should be pruned back substantially, checked for insect pests and disease, and gradually acclimated to their indoor winter surroundings. Do not fertilize during the late fall and winter. Do not overwater. Many will be completely dormant during their stay indoors.
Caring for annual herbs
Annuals are those plants which grow, produce and die within one growing season. The list of annual herbs typically includes summer savory, basil, cilantro, fennel and parsley (although the latter are also biennials). They can be planted either in containers or in the garden. A few annuals, such as parsley and basil, can be successfully grown indoors any time of year -- under proper light and temperature conditions.
Caring for plants from warmer climates
Some plants - such as bay laurel, lemongrass, capers, cardamom, Mexican tarragon, and patchouli - are tropical or semi-tropical, and will be winter hardy only in the warmest parts of the United States (zones 8 - 10). Elsewhere, they should be planted in pots and overwintered indoors. All of these plants are essentially dormant in the winter and may drop most of their leaves before greening up again in the spring. Cardamom ginger does best in shade.
General care for all herbs
Watering:
Determining how often to water your herbs depends on the season, the plant, ambient humidity, air movement, exposure to the sun, and temperature. In general, plants should be watered before they get completely dry, but not so often that the soil stays soggy. Under most conditions and in most areas of America, a deep (so that the soil is wetted 8"-12" below the surface) watering once a week should suffice after the plants are established. If you are potting your herbs, it is very important to use pots with drainage holes, and that they're not left to stand in water for more than a few minutes at a time.
Fertilization:
Plants confined to pots need more attention paid to their nourishment than garden plants. The easiest way to accomplish this is by feeding with a weak (1/2 strength) water-soluble fertilizer every two weeks during periods of active growth. A natural, slow-release formula will nourish the soil as well as the plants. When foliar feeding, apply the fertilizer in the early morning hours before the sun has warmed the plants. Scratch pelletized or granular formulas into the top 1 to 2 inches of soil. During periods of dormancy, do not fertilize at all -- the plants are resting and will not benefit from the fertilizer. In fact, fertilizing your plants during dormancy may kill them.
Harvesting:
Harvest annual herbs in the morning after the dew dries but before the day is hot. Give annual herbs their final cut before the first frost. Wait to harvest perennial herbs the year after planting, doing so only once a year. Avoid cutting into the older woody growth.
Overwintering herbs indoors:
The best way to overwinter herbs indoors is to plant them in the spring in 8"-10" pots and grow them all summer in those pots. The pots can be buried up to the rim in the garden or simply placed on the porch or patio. Natural porous clay pots are recommended.
If you decide that you want to bring a plant inside that has been growing in the garden all summer, the first step is to prune back much of the summer's growth. Well before the first frost, dig up the plant carefully, leaving plenty of earth on the roots. Place rootball in sufficiently large pot to easily accommodate the roots and back fill with good quality commercial potting soil. Water well and gradually acclimate to new light conditions. Move from full sun to part shade to almost full shade over several weeks. Appropriate winter care includes providing as much light as you can, even moisture, and reasonable temperatures.
Bay laurel, rosemary, lavender and lemon verbena are plants that need to be moved indoors if they are to survive. We strongly recommend planting them in pots in the spring.
Repotting:
Most herb plants purchased from Garden.com will be in smallish pots. These containers are meant to hold the plants for limited periods. Once they have become acclimated to your house, your herbs need to be transplanted into larger pots. Pot size will vary from species to species - check the information about each plant. Generally speaking, a 6" terracotta pot, filled with good quality potting medium, will suffice for a single season in an indoor garden.
Care for indoor plants: Most herbs require 6-8 hours of direct sunlight, or 10-12 hours of closely positioned grow lights, each day to thrive. South, east or west windows without curtains should suffice for most. If your plants get leggy, they should be moved to stronger light and rotated a quarter turn every week to provide equal exposure for all the leaves. Regular pinching of growing tips encourages bushier growth. The 65-70° winter temperature of most North American homes will be fine in most cases, but beware of either hot or cold drafts, and of placing plants too near radiators or hot air outlets. Most plants that die indoors do so because they got too hot or too dry. To increase the humidity in the immediate vicinity of the plant, place the pot on a tray of pebbles which should be filled with water daily.
Drying herbs for cooking
Just before plants begin to flower, cut leafy herbs early in the morning after the dew has dried for highest oil content. Wash off any dirt and hang to dry in a warm, airy, well-ventilated location, without exposure to sunlight. When dry and crisp, strip off the leaves and put in airtight containers. Harvest herb seeds when they mature, or place stalks upside down in a bag to collect the seeds as they ripen. Dry in a warm, well-ventilated location and store in airtight containers. Be sure to check all containers in a few days to be sure no moisture is present; if so, remove and dry further.
Troubleshooting
What should I use to control pests on my herbs?
Although not immune to diseases and bugs, herbs are certainly less prone to attracting pests than many popular American garden plants. We generally recommend using organic methods in dealing with pests. Remember - you will be growing many of your herbs to consume in one way or another and with them you'll be consuming whatever pest control you've used. So while there are other effective pest controls on the market, we think using organic solutions helps to minimize exposure to potentially harmful compounds. For flying insects, we use insecticidal soap; for crawling varieties, we use diatomaceous earth.
When I bring my herbs indoors for the winter, they are infested by pests. They do just fine outdoors.
What can I do?
Herbs are rarely bothered by plant pests in the garden, but they can be a problem indoors. Not because your house is infested (although it could be) or that the plant was infested when you bought it, rather the reason is that indoor growing conditions are not ideal. The plants are thus rendered less capable of resisting pests naturally. The two most common indoor pests are spider mites and whiteflies. Both thrive in low humidity and high temperatures.
A reasonably effective, reasonably safe means of control is insecticidal soap. If the plant is small enough, turn the pot upside down and immerse the whole plant in a bucket of the soap solution once a week. If it is too large for that treatment, spray the whole plant weekly, paying special attention to the undersides of the leaves. The key to controlling bugs is to look for them every time you water, and to begin treatment at the first sign. Waiting even one week to begin treatment can lead to an uncontrollable population explosion.
 Greenhouses have come a long way since the wealthy in Europe and America used them to force oranges and pineapples in glass structures known as orangeries and pineries. During the mid-nineteenth century, the greenhouse developed into a status symbol as well as a practical way to produce almost any crop. Today's greenhouses enjoy a tradition dating back much earlier than even the last century. Its roots go back some two thousand years. And it was not until 1599 that the first practical greenhouse was built. Designed by a French botanist, Jules David, and constructed in Holland, it was intended as a place to grow tropical plants for medicinal purposes.
 The greenhouse idea soon caught on and began spreading throughout Europe.
And experiments to improve the greenhouse concept continued through the seventeenth century. New building technology led to larger and larger greenhouses that housed plants just to please the eyes and palates of European royalty. Despite the elaborateness of these structures, it was the Victorian age in England that ushered in the golden era of the greenhouse. The wealthy began competing with each other to build the most elaborate structures, primarily to house citrus fruits and rare flowers.
The greenhouse idea soon caught on and began spreading throughout Europe.
And experiments to improve the greenhouse concept continued through the seventeenth century. New building technology led to larger and larger greenhouses that housed plants just to please the eyes and palates of European royalty. Despite the elaborateness of these structures, it was the Victorian age in England that ushered in the golden era of the greenhouse. The wealthy began competing with each other to build the most elaborate structures, primarily to house citrus fruits and rare flowers.
 In America, the first greenhouse on record was built around 1737 by a wealthy Boston merchant, designed primarily to grow
fruit.
The concept spread slowly, since almost all greenhouses were built for the wealthy. By 1825, greenhouses were increasingly common. Many were warmed by furnace-warmed air; and some were pit greenhouses built into the earth and heated largely by sunlight flowing in south-facing windows.
In America, the first greenhouse on record was built around 1737 by a wealthy Boston merchant, designed primarily to grow
fruit.
The concept spread slowly, since almost all greenhouses were built for the wealthy. By 1825, greenhouses were increasingly common. Many were warmed by furnace-warmed air; and some were pit greenhouses built into the earth and heated largely by sunlight flowing in south-facing windows.
 Indeed, the modern concept of the greenhouse is now quite simple and practical.
No longer is it the private domain of the elite classes, but something that anyone can have for relatively little cost. Today a greenhouse can go virtually anywhere there is space; it can be
attached to a house, placed in the backyard, or perched on a roof or deck.
Home production of all kinds of vegetables and flowers has never been quite as easy, or as pleasurable.
Learn more and view our large selection of Greenhouses!
Indeed, the modern concept of the greenhouse is now quite simple and practical.
No longer is it the private domain of the elite classes, but something that anyone can have for relatively little cost. Today a greenhouse can go virtually anywhere there is space; it can be
attached to a house, placed in the backyard, or perched on a roof or deck.
Home production of all kinds of vegetables and flowers has never been quite as easy, or as pleasurable.
Learn more and view our large selection of Greenhouses!


 Growing plants from seeds can be exciting. If you decide in late winter or early spring that you want to try this, follow the charts and directions on the seed packets. This can be a time consuming process, because you will have to nurture the sees in an indoor setting or cold frame, but it does give you a head start on the season.
You will need
Growing plants from seeds can be exciting. If you decide in late winter or early spring that you want to try this, follow the charts and directions on the seed packets. This can be a time consuming process, because you will have to nurture the sees in an indoor setting or cold frame, but it does give you a head start on the season.
You will need  windowsills do not offer sufficient light or heat, and some plants require what is called bottom heating, provided by coils, or a


 Most Yardiacs can't wait to start planting, so they can enjoy the taste of fresh vegetables. However, these plants actually have recommended planting times. The last spring frost is important to gardeners, in order to plan when to set out frost-sensitive annuals, vegetables, and even tropical container plants.
Some vegetables are frost tolerant, and can be planted as soon as the ground can be worked. Others are slightly less hardy and should be placed in the ground 2-4 weeks before the average last frost date, which is a specified date calculated for an area after which frost is unlikely to occur. Frost sensitive plants, such as melons, peppers, and tomatoes, should be planted after the last frost. Check with the extension service in your area for this information.
Unfortunately, cold weather may still occur after the crop has been planted, and some kinds of protection will be needed to shelter sensitive plants. To retain heat, cover frost sensitive plants just before sundown using nonmetallic containers, or old lightweight blankets, or row covers. Container plants are easy to deal with. Just move them to a garage or other protected areas.
Yardiac has a great selection of
Most Yardiacs can't wait to start planting, so they can enjoy the taste of fresh vegetables. However, these plants actually have recommended planting times. The last spring frost is important to gardeners, in order to plan when to set out frost-sensitive annuals, vegetables, and even tropical container plants.
Some vegetables are frost tolerant, and can be planted as soon as the ground can be worked. Others are slightly less hardy and should be placed in the ground 2-4 weeks before the average last frost date, which is a specified date calculated for an area after which frost is unlikely to occur. Frost sensitive plants, such as melons, peppers, and tomatoes, should be planted after the last frost. Check with the extension service in your area for this information.
Unfortunately, cold weather may still occur after the crop has been planted, and some kinds of protection will be needed to shelter sensitive plants. To retain heat, cover frost sensitive plants just before sundown using nonmetallic containers, or old lightweight blankets, or row covers. Container plants are easy to deal with. Just move them to a garage or other protected areas.
Yardiac has a great selection of